


Chapter 10 Night
After the horror show that's Chapter 9 Night, what could 10 Night be? Even more Manticore death stacks? Infinitely harder maps with a puzzle attached to them? Judge fight featuring Red Golyats? Nah, none of that. 10 Night is actually a lot easier than 9 Night, thankfully. The maps are a lot simpler, but have some of the puzzle-like mechanics that require some thinking to get through.
Overall, you'll want to have at least two AR/SMG echelons that can deal with some fairly strong enemies (particularly the buff as fuck Dragoons) as well as a decently strong RF/HG echelon. Having a HOC like 2B prepared will also help a little on 10-4n.
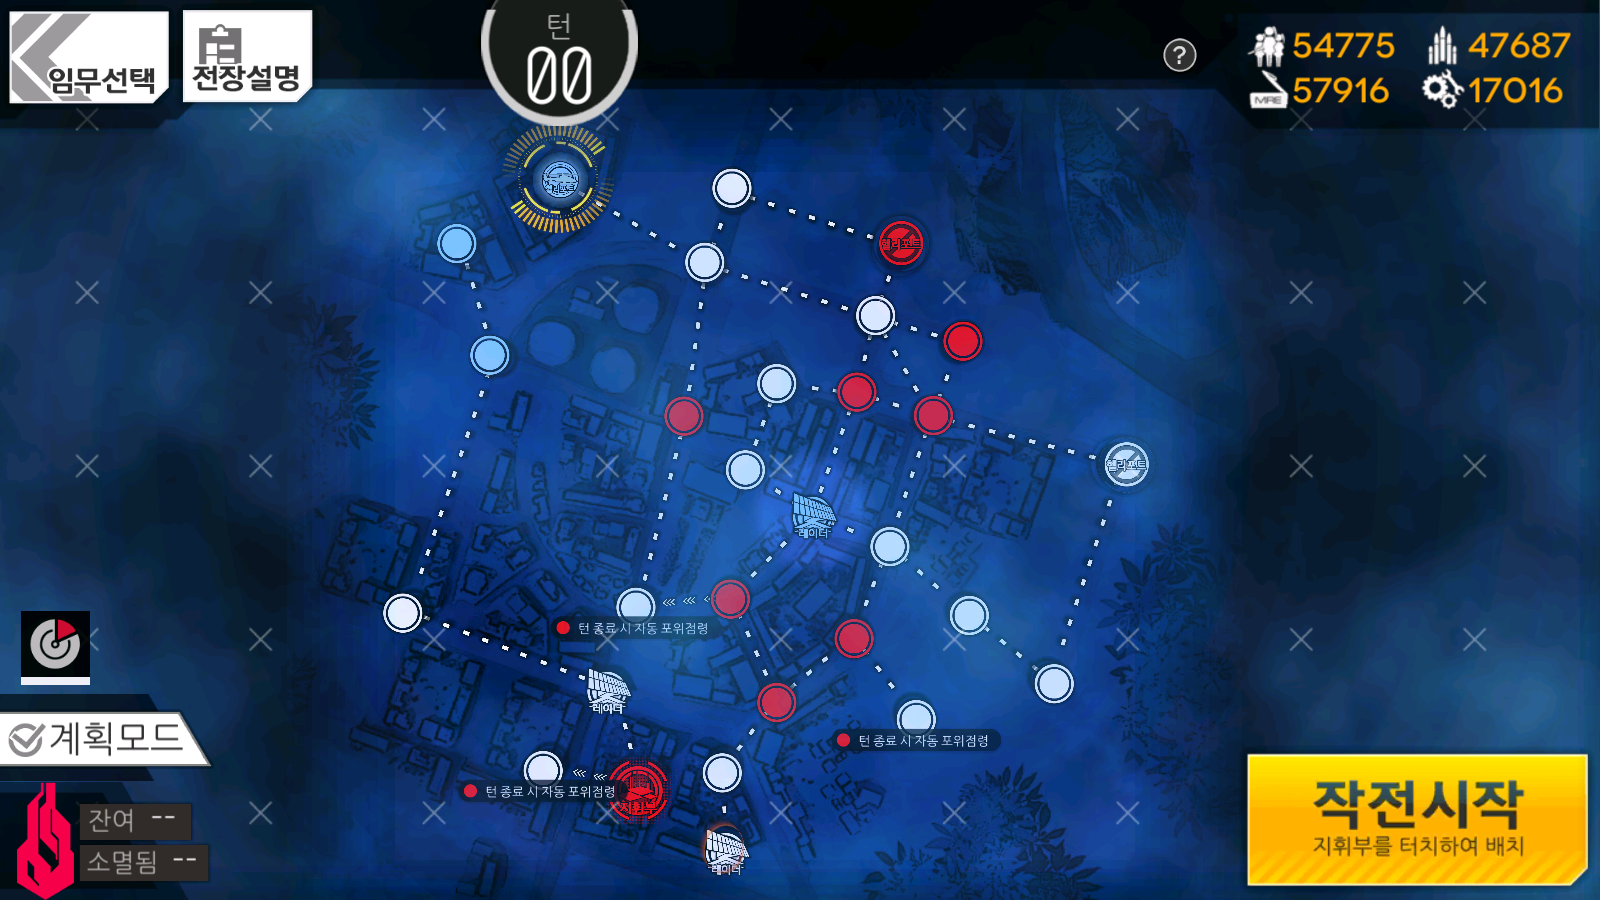
10-1n#

Objective: Capture Enemy Command Center
Turn Limit: 3
Echelon Limit: 2
Recommended Echelon(s): AR/SMG, Dummy
Pretty nice and easy map to start off the chapter. We can either go to the right of the Heliport we start on, or go to the left and through the center of the map. For this guide, we'll be going through the center of the map. The right has armoured enemies as well as a Manticore standing right in our way.
It's quite simple: On turn one, go down to the left of the starting Heliport and deploy a dummy echelon. On turn two, you can start heading down to the enemy Command Center. Don't try and engage every enemy you see, even if it's close to your Heliport. By the time they become an issue, you're right next to the enemy Command Center and can win.
Stick to the left side of the center of the map, lest you stray into extra battles you don't need to fight. Just keep moving to the enemy Command Center. At the end of turn 3, there's a potential enemy that could attack your dummy echelon and take your Heliport, but you're one node away from the objective, so retreating is fine. On turn 4, you can capture the Command Center and end the map.
Video of me clearing this map
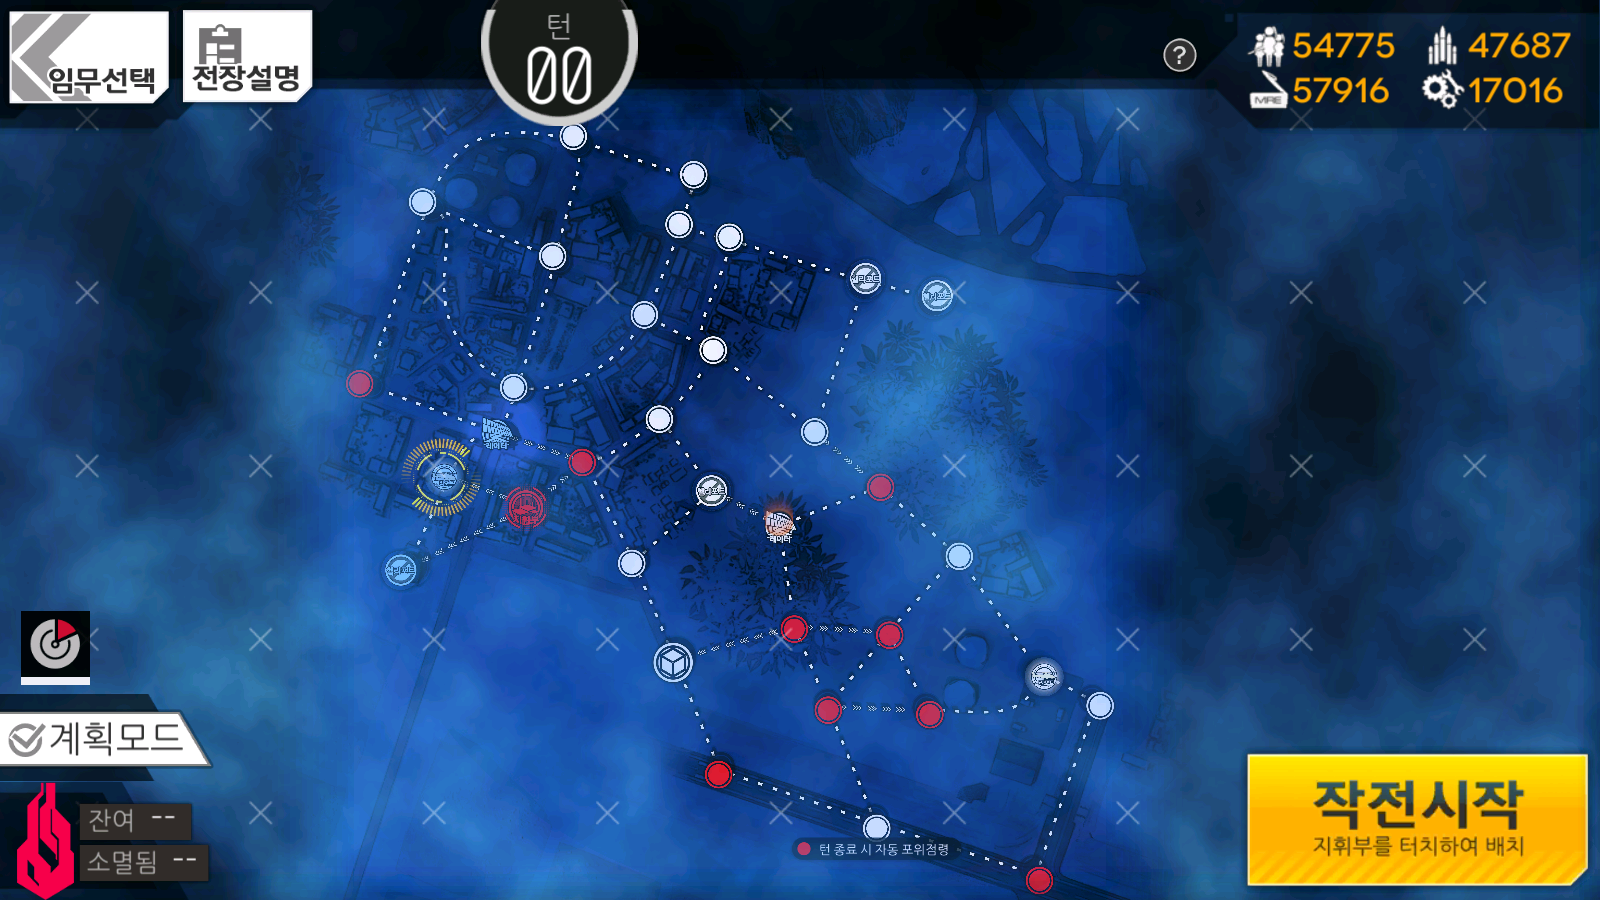
10-2n#
Objective: Capture designated Radar Tower
Turn Limit: 4
Echelon Limit: 2
Recommended Echelon(s): Dummy x2
Surprise, it's a puzzle map; there's no combat needed to pass this chapter. There's a few main things we need to do to solve this. First, we need to move some Manticores out of our way, and second, we need to build some AP to get to the Radar Tower in time.
So, we can take care of the first problem later, but what we need to do is start building some AP. On turn 1, deploy your dummy echelon and move it out one node, then deploy your second dummy echelon. This second dummy echelon will be handling the Manticores, while your first will be getting AP.
On turn 2, move your first dummy echelon to the nearby closed Heliport. Then move your second dummy echelon out of the Heliport with your remaining AP. For turn 3, move your first dummy to the other closed Heliport (the neutral one) and take it. With your remaining AP, you can move your second dummy echelon down towards the one-way path south of your starting Heliport. This will put it within range of a Manticore's alert area, causing it to move away from you later.
Turn 4, move your first dummy echelon to the Radar Tower we started with at the beginning of the map. Move your second dummy echelon away from the Manticore that's about to end their lives.
On turn 5, you can now walk around the Manticore that moved to greet your first echelon and head to the objective. Take that Radar Tower to end the map.
Video of me clearing this map
10-3n #
Objective: Capture designated Radar Tower
Turn Limit: 5
Echelon Limit: 1
Recommended Echelon(s): AR/SMG with Airstrike Fairy
I'm gonna clarify that Airstrike Fairy recommendation before we start this. There's two Dragoon echelons that have reverse Dinergates (when Dinergates come in behind the other enemies). This is absolutely fucking brutal and can end your life. However, running an Airstrike Fairy negates that entirely. Your alternative to that is using something like AUG or SAR-21 and hoping real fucking hard that they kill off the Dinergates fast enough. There's enough of them that dolls like RFB and rifles would struggle to deal with them before you implode.
10-3N is a game of "dodge the super Dragoons". Any Dragoon echelon with a skull icon and around 92k CE is likely death, and should be avoided. I'm pretty sure at least one of the super Dragoons is also an RNG spawn, and can likely throw off any given strategy. So, if you get issues from one while following this, not my problem.
Anyway, since we only can use one echelon in this map, we need to go out of our way to snag some extra AP to dodge some of the Dragoons hanging about. So once you deploy, head up through the only route we have to escape our starting location. We'll want to start moving off to the right side of the map, so when you get the chance, move off to the right. Try and end the turn in a location that isn't gonna get you killed by a super Dragoon.
On turn 2, we can start building some extra AP to get us through the bottom part of the map in one piece. For that, we need to take a detour off to the closed Heliports on the top right of the map. Sit on the first one you can get to, so you surround capture the other at the end of your turn.
On turn 3, we can start moving down through the map. The other closed Heliport on the map we haven't taken is our next destination. We'll stop there so we don't get killed by a super Dragoon, and in doing so get a little extra AP for the next turn.
For turn 4, we'll go down, grab the Supply Node, and go past it to the very bottom of the map. It may be very enticing to engage the 75k CE Dragoon that you'll pass by, but it's probably not a good idea. Your goal is to head towards the Heliport that's chilling down in the bottom part of the map. You won't get there, but that's a good landmark. At this point, you'll see some 33k CE Dragoons showing up. These are the fights you want to be using the Airstrike Fairy on, if you weren't using it already.
On turn 5, we'll make it the rest of the way to the Radar Tower. You should be next to the Heliport I mentioned earlier, so move through that and kill the next 33k CE Dragoon. From that Dragoon, you can now walk to the Radar Tower. It should be a straight shot, since any other paths are blocked by one-way paths or 92k/75k CE Dragoons. Once you've gotten to the Radar Tower, take it and end the map.
Video of me clearing this map
10-4n#
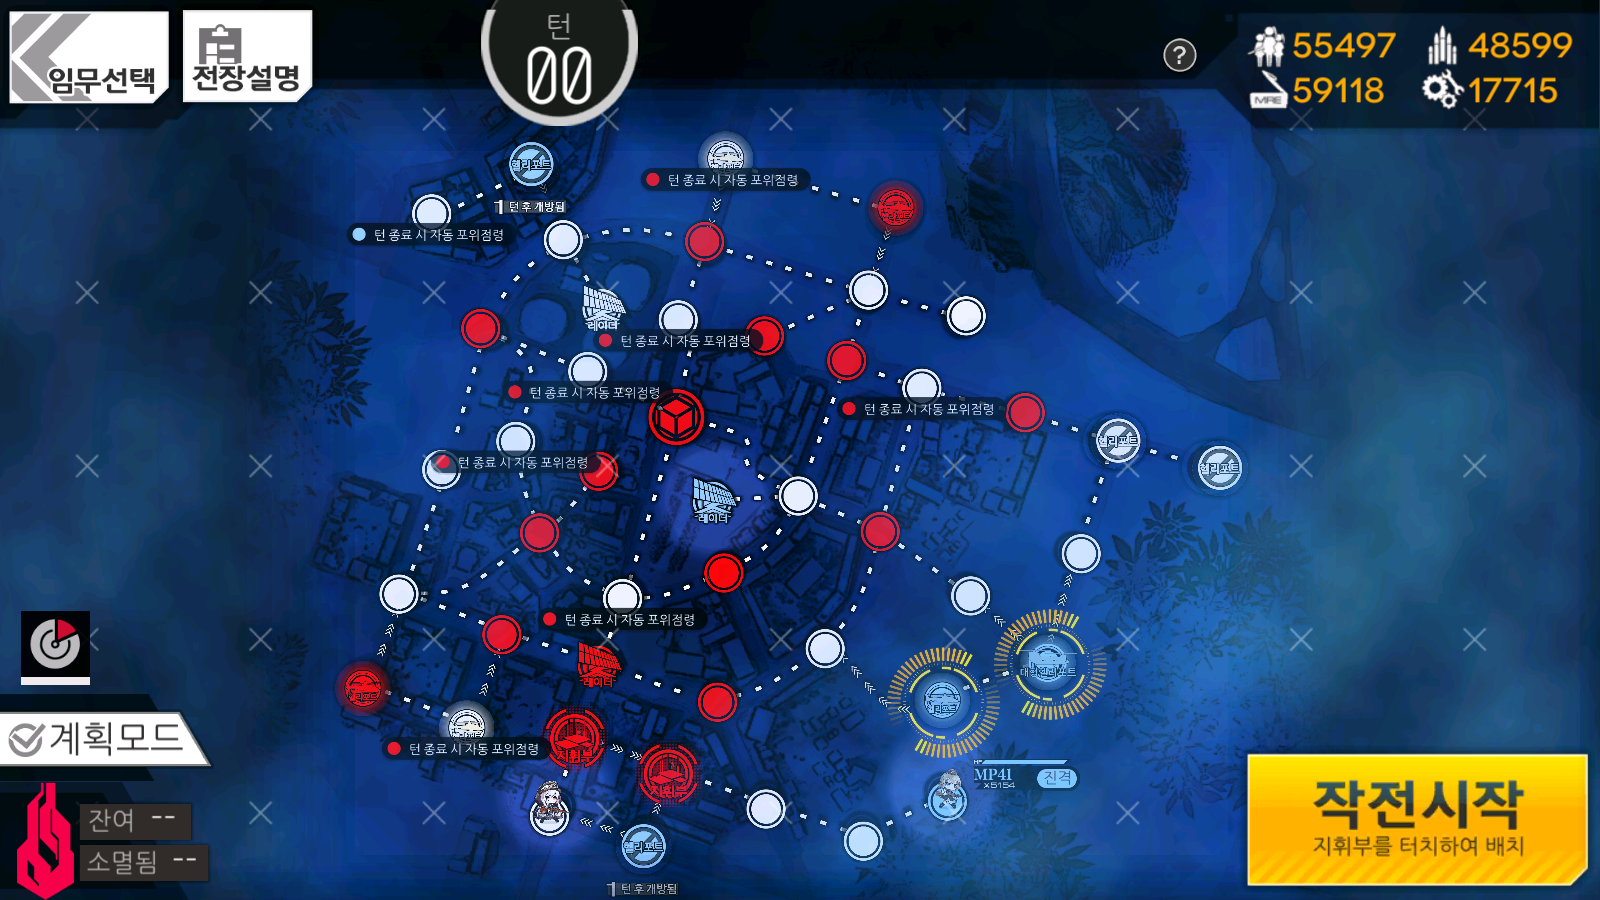
Objectives: Kill 12 enemies and defeat Gager
Turn Limit: 3
Recommended Echelon(s): AR/SMG (x2), RF/HG, Dummy
For this last map, we need to kill enemies up until MP41 gives us vision on the closed Heliport on the isolated section on the map with Gager. At minimum, we need 11 kills on the side of the map we can access, since Gager counts as one of the kills. The Heliports that Sangvis controls spawn reinforcements as well, so we don't need to go out of our way to kill a ton of enemies. The main idea is to split up your echelons so one is on the top side of the map, and the other is on the bottom. You'll want to use AR/SMG for the bottom and RF/HG for the top. Then, once MP41 gives us vision of the Heliport next to the enemy Command Centers, we deploy an echelon down there and defeat Gager with it. Okay, so how do we go about this?
To start with, we'll want to grab the two closed Heliports north of our starting location. This is optional, and can be a little difficult due to the beefy Manticore echelon here. But if you're at this point, I think you'll be able to kill it. Ideally, we'll be using an RF/HG for this, since they probably have a marginally easier time with the Manticores. Move up to the first closed Heliport from the Heavy Heliport and leave your echelon there for now. If you're using a HOC for this map, now's a good time to deploy it on the now-empty Heavy Heliport. 2B14 can definitely help smooth out killing some of these enemies if you're struggling.
We have a few different routes we could follow at this point, mostly on where to move the AR/SMG echelon. I personally like to swap with 2B14, move to the nearby Dragoon, and then deploy a dummy echelon for extra AP. This puts us in a nice position near the middle of the map so we can pivot to wherever Sangvis' units move.
On turn 2, movement becomes skewed, as enemy movement RNG can shift what we want to do here. Generally though, you'll want to move your RF/HG to the top part of the map (near the Heliports spawning Nemeums) while also using your AR/SMG to head to the bottom half of the map, near the other two Sangvis Heliports. Be sure to resupply whichever echelon you feel like you'll be doing more combat with via the Supply Node in the middle of the map. You need 11 kills in this part of the map and you can't resupply without retreating and redeploying, so taking full advantage of the Supply Node is key.
Once you make it to turn 4, MP41 finally will let you deploy to kill Gager, so you can either deploy another AR/SMG echelon down there to take care of her, or retreat the one you've been using so far and redeploy it down there. Either method works, but if you retreat an echelon from the map, you won't get an S rank. Gager herself shouldn't pose much trouble, as she's not much different from her previous iterations; the only increase in difficulty is her stats, which you should be able to deal with at this point. If you need any extra kills, you can pick them up after killing Gager, but ideally you'll be at 11 kills before this point. Once you get both objectives done, you'll be done with the map.
Video of me clearing this map
Author: Kazuki
Tags: Chapter Overview