


Beyond The Border III EX
Objective: Establish and maintain a supply line for 3 turns.
Recommended Echelon(s): RF/HG (x2), Gunboat (3MG,2HG), Dummy, HOC
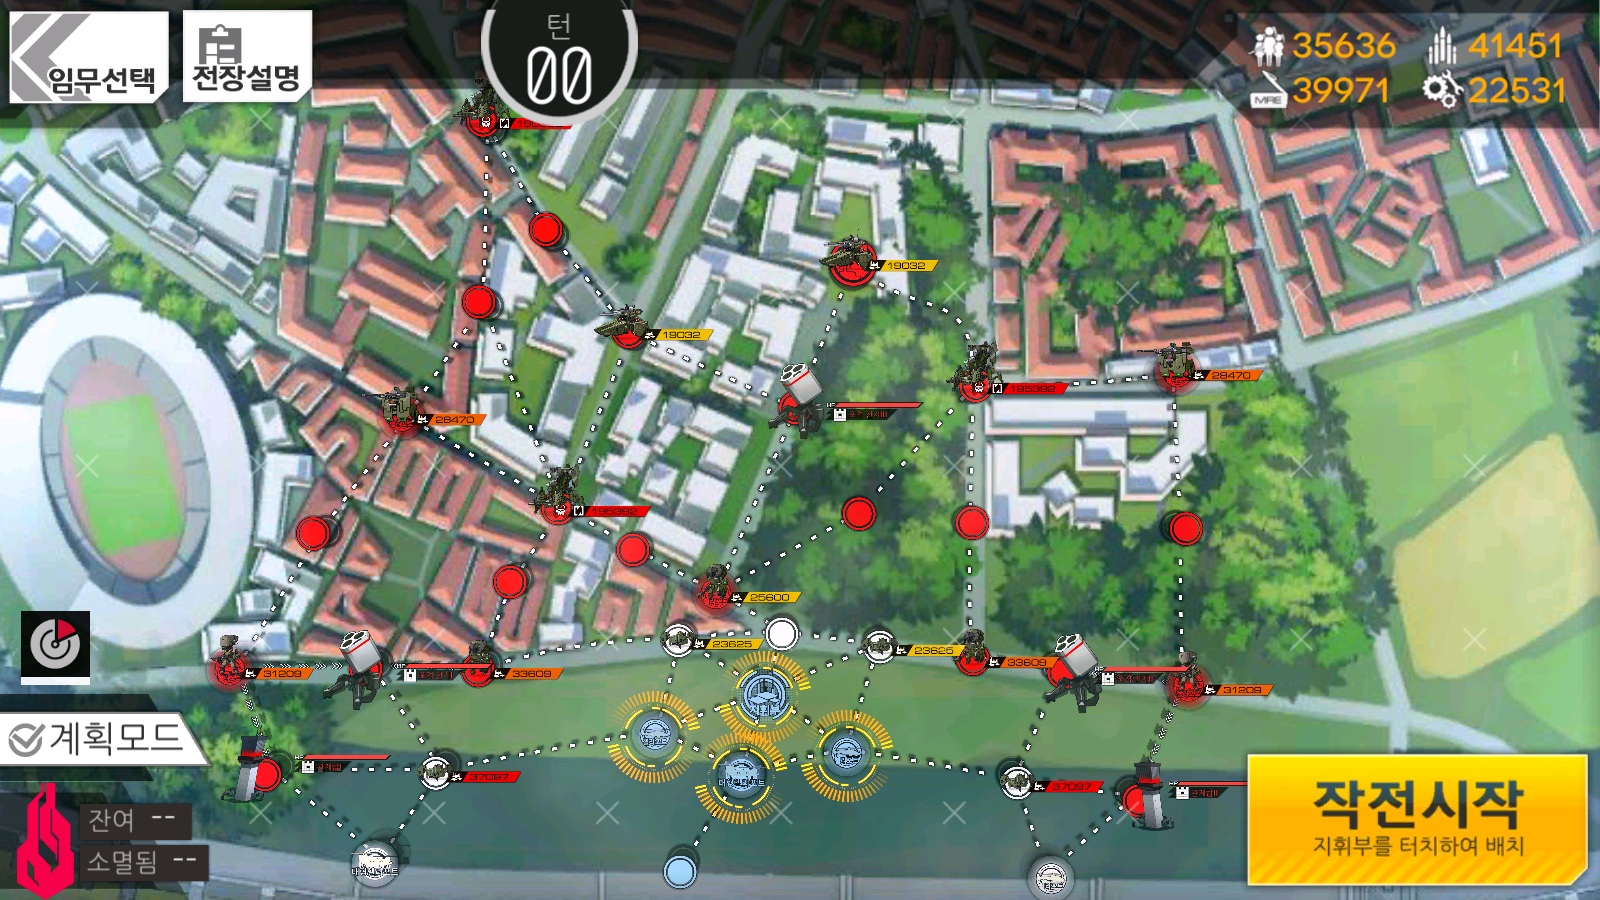
This map can look pretty intimidating with the Hydras coming down and the multiple Typhons being...Typhons, but it can essentially be broken down to two things. First, we need to use an echelon that can deal with Typhons to establish the supply line. And second, we need to defend our Command Center. All of the enemies on the map except for the Hydras are set to "Capture HQ" AI, so you'll have a fair few of them coming in.
To start off with, we'll be deploying three combat echelons. The one you deploy on your Command Center should be able to deal with Typhons. These Typhons aren't going to be nearly as bad of a DPS check as Typhons you may have fought previously. The Typhon on the bottom row is within firing range of you if you have a unit in the front column, which makes it a much easier kill.
On the two Heliports on the side of your Command Center, you'll be deploying the echelons that will defend your Command Center. On the Heavy Heliport, pull out a HOC. The HOC will be for breaking an enemy mortar, but won't be used otherwise.
For turn one, there's two things to do here: clearing out the Dactyls threatening the Command Center and establishing the supply line to the extent possible. With the echelon on your Command Center, clear out the two Dactyls, then move to the node directly above your Command Center. Now, deploy a dummy echelon on your Command Center, so we can swap a HOC up to where your combat echelon is. This will put it in range of the mortar so you can blast it. It may give you some issues with the next fight, so it's best to kill it now with a HOC. Swap the HOC back to the Heavy Heliport and continue on. We want to take the Heliport the Aegis is sitting on, as well as the node directly above the Command Center. Use your combat echelon and the dummy echelon for this. That's it for this turn.
Turn two, we have more enemies coming in from the sides, this time we need to use the other two echelons we deployed to defend. Take them out with your echelons and move back to the Heliports. Now we can focus on finishing the rest of the supply line. The dummy and combat echelons we used in the previous turn to capture the Heliport and other node can be used for this. Move that combat echelon up to the Rally Node to clear out the trash there. Bring your dummy echelon up next, and swap with your combat echelon. Nothing should go for you on the Rally Node, but a Typhon will come in on the other node you need to take.
After you've gotten the supply line up and running, you can move the combat echelon by the Rally Node down to the Heliport to defend there. Things will go through that area and will break the supply line if you don't stop them. Keep up the defense of your Command Center until the Hydras are knocking. The Hydras won't take your Command Center, so once they're right on top of you, retreat your echelons. By turn five, you should have had the supply line long enough to clear the map.
Video of me clearing this map
Author: Kazuki
Tags: Isomer