


111 EX
Objectives: Capture all Heliports, Elimination
Failure Condition: The Commander dies
Recommended Echelon(s): AR/SMG (x2), Bamboo RF+Taunt, Dummy, HOC
Supposedly one of the hardest maps in PR. Unlike the chaos of 10, this map is more manageable with some decent strategy. I'd also recommend using a grenadier in your AR echelons due to the enemy compositions here.
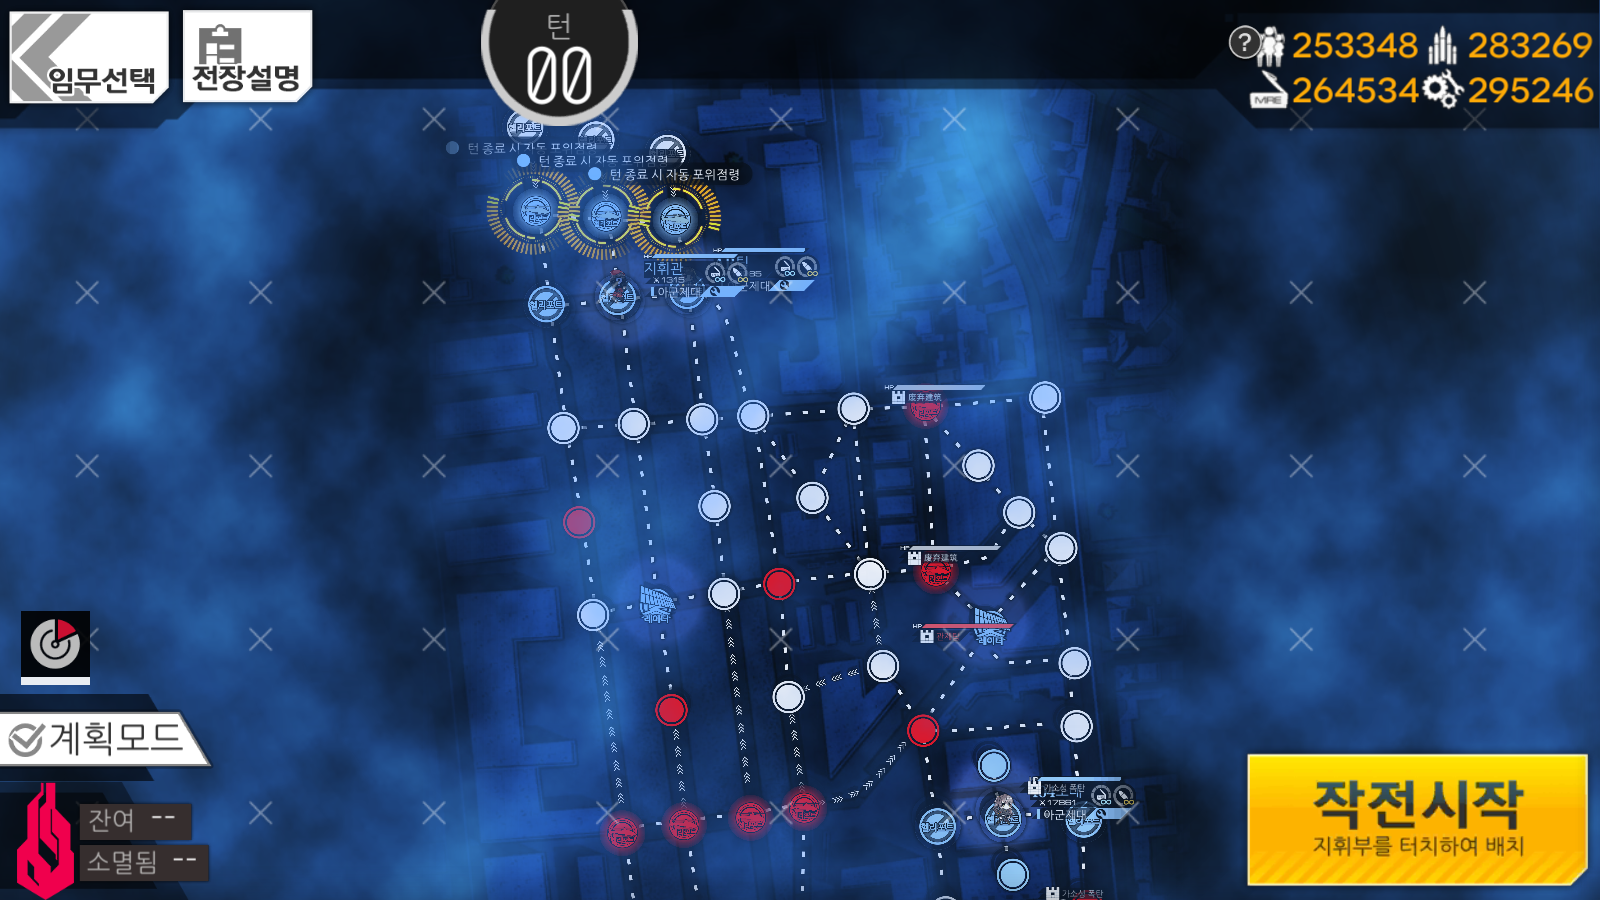
To start us off, deploy a dummy echelon on the left Heliport, and your two AR echelons on the other two Heliports. We want to make sure we have a safe spot for the Commander to hang out at while we deal with the rest of the map. So, to do that, we need to move over to the right side of the map. Move the echelon on the right Heliport all the way to the enemy owned Heliport on the right, the one above the Radar Tower you own. Bring the Commander to the Heliport just above the one your first AR echelon is on. Swap your second AR echelon with AR team, then move them to the ruined building to the left of the Commander. Use the remaining AP to have 404 snag one of the explosives on the bottom right. We need that to deal with some approaching death stacks.
On turn two, move your first AR echelon down towards 404. If there's an enemy in their way, that clears 404 to pass by. Either way, we do need them to go down there to grab the second explosive later. Have them stop in the patrol pathway of top Strider. We'll have 404 swap through them and then have 404 move up to the Command Tower to destroy it. We then want to have 404 drop the explosive charge on the ruined building above the Command Tower. Be sure to move your first AR echelon to where 404 started, so Striders don't kill them.
Next, we want to move our dummy echelon to the right of the building we have explosives set on. This is to prevent the Hannibal from fucking off in a different direction while we explode it. Move your second AR echelon and the Commander one node to the right to keep them out of reach from said Hannibal. Move AR team to the node above your dummy echelon. Use your remaining AP to snag another explosive with your first AR echelon. Be sure to retreat your dummy echelon when the Hannibals attack it.
On turn three, we now want to have the second explosive ready to be used. So move your first echelon back up to the two Heliports you captured. We're going tto be using the AR team echelon as bait now, so leave them on the ruined building. Deploy your Strider killing echelon now as well.
Turn four is when our backup should arrive. We'll gain access to HOCs as well as have three extremely powerful SF echelons provided to us. First thing we want to do is use those SF echelons to capture all of the Heliports directly above them. Be sure to use Scarecrow's skill to have all four Heliports captured. Deploy a HOC, preferably something like Mk153, AT4, or BGM. We can now engage the Strider echelons. Move your bamboo echelon down and get ready to fight the Striders.
On turn five, you can repair your bamboo echelon if needed. By now, a Hannibal death stack should be near the second ruined building. Toss the explosives on it and end the turn.
Turn six is cleanup more or less. Have HOC support for the last Strider kill here, then we want to start moving up with the SF echelons to clean up the remaining enemies. Be sure to bring your HOC with you here. The death stack is no joke. Have all the Heliports captured at this point, and the map should be cleared.
Video of me clearing this map
Author: Kazuki
Tags: Poincare Recurrence