


Fractured Cognition IV EX
Objective 1: Fight, but do not kill M4A1, it's a minigame or something, idk
Objective 2: Rescue and secure one hostage.
Recommended Echelon(s): AR/SMG, Dummy, HOC
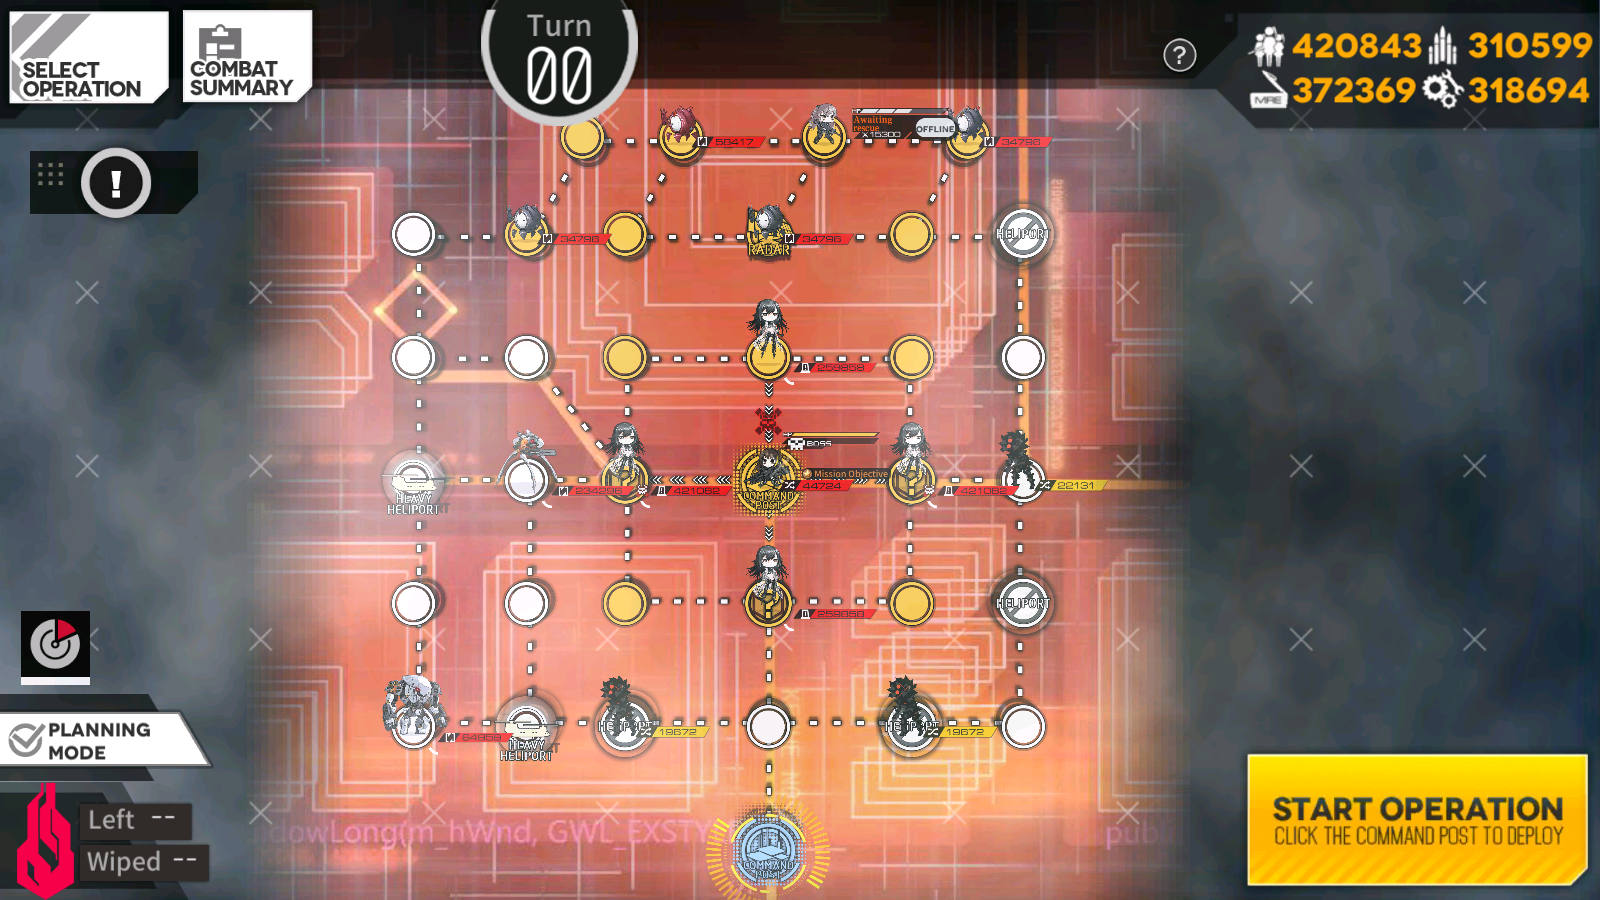
Objective 1
We're not pressed for time on this objective, but it's a fair bit harder than objective 2. We need to go up to the hostage, step on the Radar Tower to change some AI, then take a Heavy Heliport for HOC support, kill a white Isomer, then fight M4. It's a long list of shit to do.
For turn one, we want to grab the closed Heliport to the left of our Command Center to start us off. On turn two, deploy a dummy echelon and start moving your combat echelon to the closed Heliport to the right, resupply before going past your dummy echelon, and end at the closed Heliport. For turn three, move all the way up the pathway up to the top half of the map and chill on the last closed Heliport in that path.
For turn four we'll need to be sure to step on the Radar Tower. So do so, then swap with the hostage so you can go around the patrolling red Golyat. Move past its alert radius and start heading towards the Heavy Heliport we need to take.
On turn five, before we can take the Heavy Heliport, we need to stand on the random node that's next to M4. This will change the AI of the Patroller to alert, so it won't move and bother us anymore. We'll need to stall a few turns after this so the Gladiator will fuck off. Stay in a safe spot and end the turn until turn seven. On turn seven, we can take the Heavy Heliport. Do so.
At this point, we're winding down the map. Turn eight will have us engage a white Isomer, and then fight M4 on turn nine. Move off the Heavy Heliport towards the Isomer and then deploy an HOC (BGM recommended). Engage the Isomer.
Nyto Isomer White
So for this boss, she'll do a lot of shit that doesn't really matter, since it's a debuff. Her main thing is that she has failed Isomers coming in constantly that you need to take care of before they stun you with an EMP. For these, once they start getting close to you, retarget your ARs so they focus fire them.
She does a lot more than that, though. Every so often, she'll pick one of your T-Dolls and put them into a stasis. She will then summon a clone of herself that will start shooting you. The clone has a taunt effect so all your T-Dolls will focus it down. Killing the clone will end the stasis. These clones, I believe, also give an HP shield to all enemies on the battlefield at the time. Fun. Oh, and the clones also have different targeting, because they change type of weapons depending on what T-Doll gets hit with the stasis!
Oh, but that's not it, she also has skills. At around every quarter of her HP, she'll use her skill called Epiphyllum Illusion, which will once again stasis one of your T-Dolls. However, now there's multiple clones with HP shielding to cut through. The amount of clones she spawns is equal to how many T-Dolls you have left on the field. Five T-Dolls up? Five clones spawned. This is a hard DPS check, since if you don't kill the clones fast enough (within 15 seconds), the stasis will become permanent for the battle. And there now will be a clone that is invulnerable and will stay there for the rest of the fight. So...DPS hard and fast.
If you can clear all of this, well, congrats, you've got one boss down, but you still have M4 to deal with. If needed, return to the Heavy Heliport and repair. You'll need to wait a turn anyways for the much stronger white Isomer to walk away from the path to M4. On turn nine, we can engage M4.
M4A1
So, this really isn't fighting her, since we need to avoid killing her. The goal for this fight is to kill the failed Isomers that M4 will continually spawn in; once you've killed enough to fill the bar at the top of the screen, you'll win.
There's not much in the way of mechanics for this, but M4 does have her cannon skill, Avenger's Mark. It's nothing particularly hard to deal with, she'll just fire at one of your T-Dolls with it. She will critically damage a T-Doll with one hit when she uses it though, so try not to get hit by it.
To clear this, I would recommend staying out of range and shuffling your SMG back and forth so you don't get into firing range of M4. Remember, your T-Dolls will fire and attempt to kill M4, so staying out of range is the easiest method to not fuck that up. Once you've killed enough failed Isomers, you'll complete the fight, and the map.
Objective 2
The much easier objective. Now we don't need to play with the white Isomers and can just extract ourselves real quick-like after we get the hostage. So, time's ticking as we need to actually rush to the hostage. So we'll do that.
On turn one, head to the right closed Heliport and take that. For turn two, head upwards to the next closed Heliport on the pathway you're on. Deploy a dummy echelon on your Command Center. On turn three, would you believe it if I said you want to stay at the next closed Heliport on that path up? Yeah, you do. That 2 AP won't be missed.
Turn four is when we actually get to play the game. Not really. You go up to the hostage, swap with it, pick her up, then walk your ass down the path you came up from back to your Command Center. Whenever you get back home, secure the hostage and end the map.
Videos of me clearing this map
Objective 1
Objective 2
Author: Kazuki
Tags: Shattered Connexion