


Farewell Tallinn I Combat II EX
Objective: Rescue and secure 3 hostages and have allied NPC M4A1 on top of the designated Heavy Heliport
Turn Limit: 4
Recommended Echelon(s): AR/SG (x2), Dummy (x2)
You want a two shotgun setup for one of the AR/SG echelons and a one shotgun setup for the other. I highly recommend running at least one grenadier in the AR/SG echelons. Grenades come in handy during the later stages of this map due to the zombie swarms. You'll also have your echelons taking on collapse fluid damage, making grenadiers like SOPMOD II or 416 very handy.
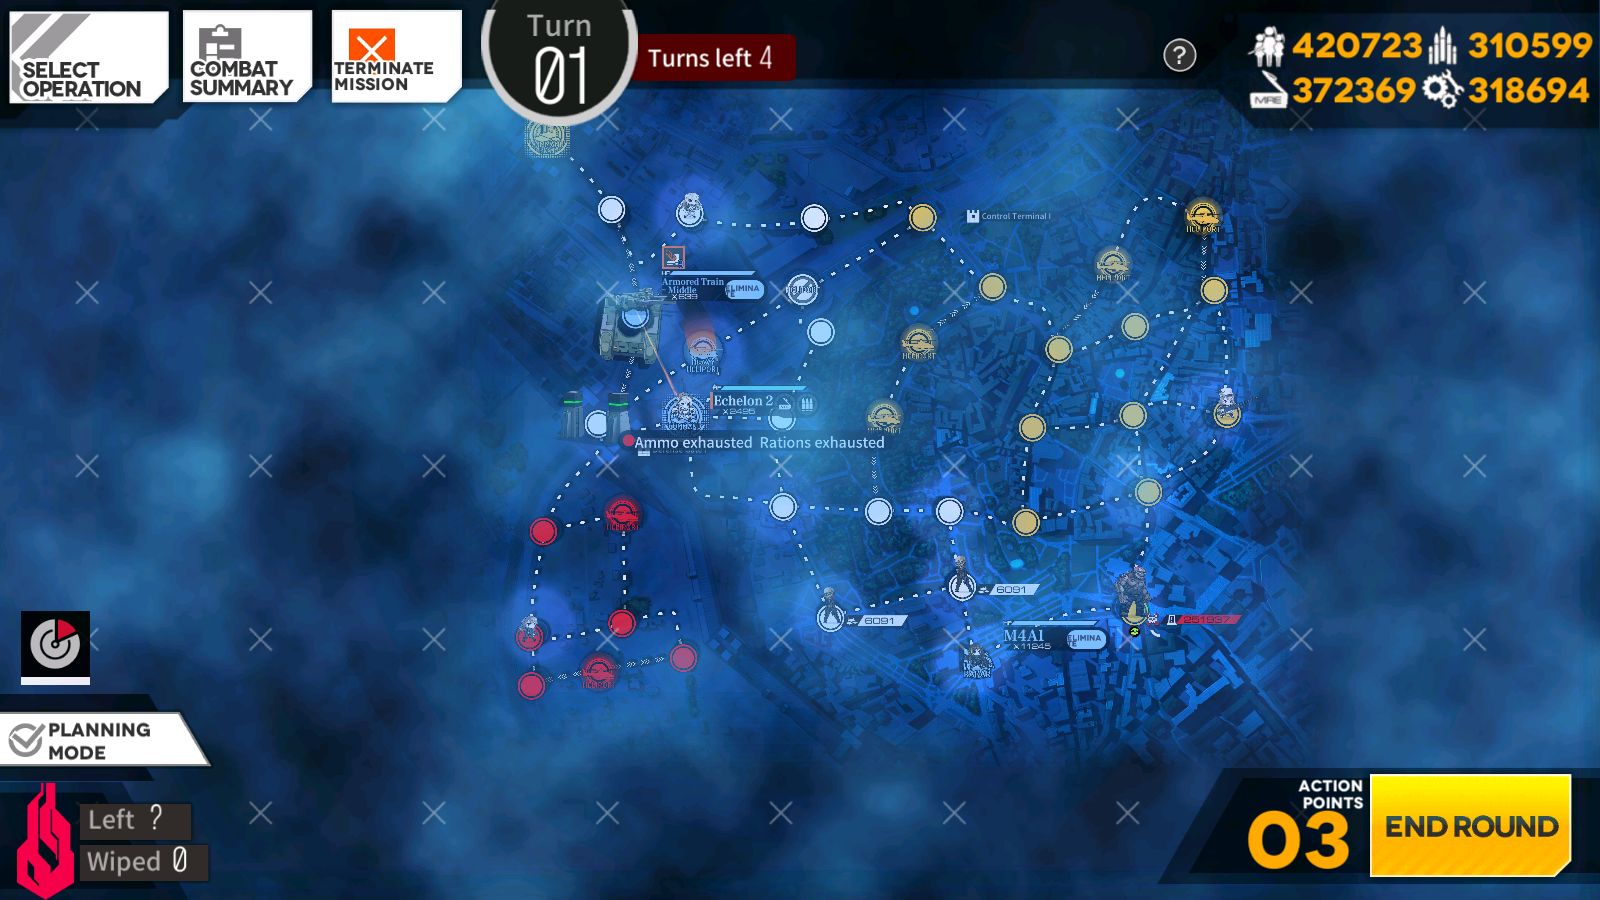
We got a lot of ground to cover for this map, with the hostages and M4 just strewn about everywhere. Our first priority should be to handle UMP45 and close the gate that blocks the Military in. They'll be VERY annoying if we don't, since they'll continually attack our Command Center. Once that's done, we can handle M4 and then the other two hostages.
For our opener, deploy the single SG AR/SG echelon on your Command Center and a dummy echelon on the Heavy Heliport. The first thing we want to do is take that dummy echelon and head straight to UMP45. Don't rescue her, however, just swap with her. Deploy the double SG AR/SG echelon on the Heavy Heliport then move to the nearby closed Heliport. End the turn.
On turn two, it's time to rescue UMP45 properly now. Rescue her and then move back to the gate. Swap with the echelon on our Command Center and extract the hostage, then swap back. Time for M4A1 now. With your Command Center echelon, move one node to the bottom right and then deploy a dummy echelon from the Command Center. Swap your AR/SG echelon with that dummy echelon then have the dummy echelon move to M4 and swap with her. With your last AP, move your two SG AR/SG echelon to the console at the top of the map. After it kills the Pixis, use it to slam the gate shut to prevent the Military from harassing us. End the turn.
The dummy echelon you had swap with M4 probably had to retreat by this point. We can redeploy it later, but for now, with the echelon on your Command Center, swap with M4 and then set her AI to Standby. It's time to go rescue Kord. Head directly to her, swap with her, then rescue. Start moving back to your Command Center with the remaining AP.
On turn four, we can extract Kord and grab Deagle. Finish returning back to our Command Center with the echelon you sent out to grab Kord, and extract her. You'll have to swap with M4 to extract her, so do so and swap back to have M4 on our Command Center. Deploy a dummy echelon on the Heavy Heliport and use it to swap with M4 once again. M4 should be on the Heavy Heliport now, checking that requirement off. To wrap the map up, we just need to rescue Deagle. Simply just use the echelon that went to close the gate to rescue her and then make your way back to the Heavy Heliport M4's on. You'll be able to extract Deagle on turn five; just swap with M4, then swap back. Once you end turn with all the hostages rescued and M4 is on the Heavy Heliport, you'll clear the map.
Video of me clearing this map
Author: Kazuki
Tags: Shattered Connexion