


The Last Rain In The World Normal
Intro#
This is a map that demands a lot from a new player. You're expected to field multiple echelons that can at least deal with 5k CE enemies, along with one that can deal with the boss of this map. It can be fairly difficult to do this, but as the top half of the map is less combat orientated, a newer player can afford to skimp out on some of their combat echelons. But hey, did I mention this is at night too? Yeah, good luck with fielding the needed stuff for this.
Strategy#
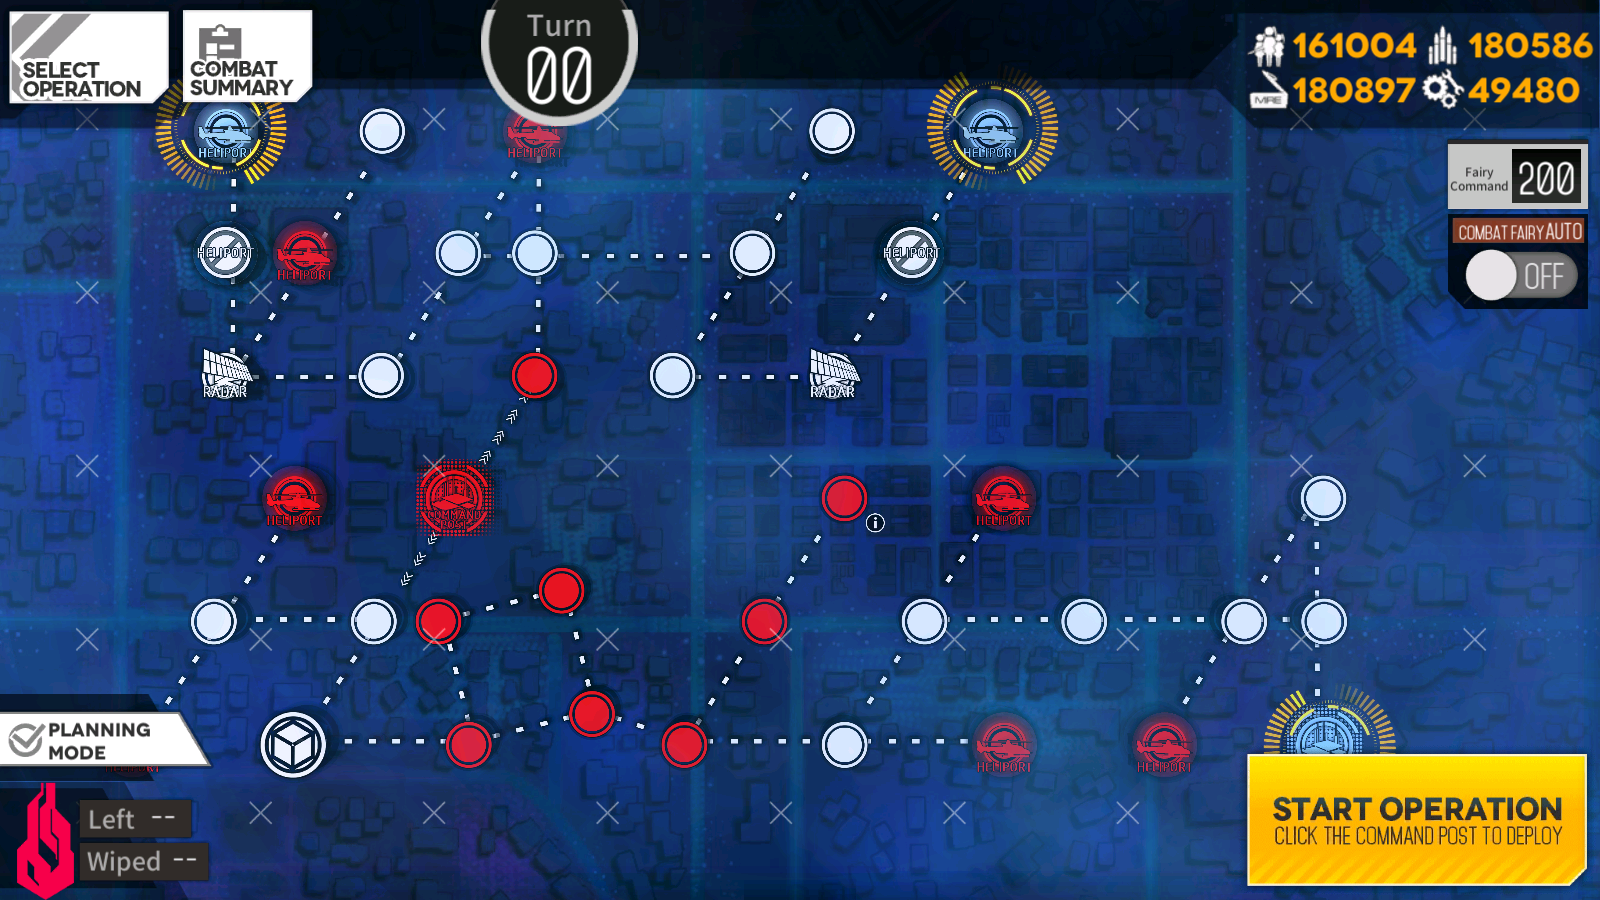
Objective: Capture enemy Command Center
Recommended Echelon(s): AR/SMG (x3)
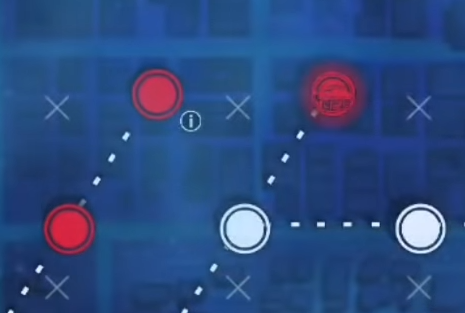
Your goal is to surround the enemy Command Center. There's two things that make this particularly difficult. One, the map is split into two, with no way to access the other side normally. Two, there's a boss sitting directly ontop of that Command Center, ready to fight you if you try and surround it. Let's break this down.
The top half of the map is a less combat orientated section and makes use of the aggro mechanics to challenge you. The main thing to look out for here is the unkillable Dopplesodner Dabbing Söder GUNDAM that hangs out in the middle of the top half of the map. It has a fairly large aggro radius, I believe it goes to the two Radar Towers on either side of this section of the map. This large aggro radius is your key to completing this part of the map. The idea is that you'll bait it to one side of the section and have your other echelon swoop in and take the node that it's guarding.
The bottom half of the map is a long rush to the node south of the enemy Command Center. Most of your AP should be spent here as you'll want to get to the left side of the map as soon as possible so you don't have to deal with all the nodes on that side being taken. There's not much to say aside from that there's an unkillable Dopplesodner Duped Sulla GUNDAM patrolling around in the square of nodes that you need to dodge:
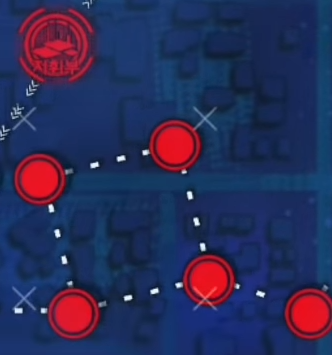
There's also another enemy that patrols in the same place, but that one is killable so you don't need to worry about that.
So, now you know what to do for each section, time to put it together.
Your immediate priority is to get as much AP as possible. You'll want to capture the two Radar Towers on the top half of the map, as it'll surround the closed Heliport and start progress on the top half of the map. With the remaining AP, you'll be able to move the echelon you have on your Command Center to surround one of the enemy Heliports. This'll make your Command Center safer and give you a bit more AP.
From turn 2, you'll want to do most of the movement you need to do in the bottom half of the map. You can run into the unkillable Dopplesodner Double Soddy GUNDAM patrolling around, so try to play it safe when you're going through the square. It's hard to do anything on the top half without possibly making the aggro of the Dopplesodner Doriprismatica sedna GUNDAM up there go wonky, so try and not do anything there.
On turn 3, you can finish the bottom section off after resupplying from the Resupply node. After you make it to the node south of the enemy Command Center, you can move your unit from the top half of the map into position at the node north of the Command Center. This will surround it as soon as you survive the end of the turn.
It's time for the boss...I'll avoid naming her I guess?
???#
This is a boss that's from a story event originally, but due to collab fuckery reasons that I won't spoil, she's appearing here in VA-11 Hall-A.
The main thing she's going to be doing is doing a line mark skill
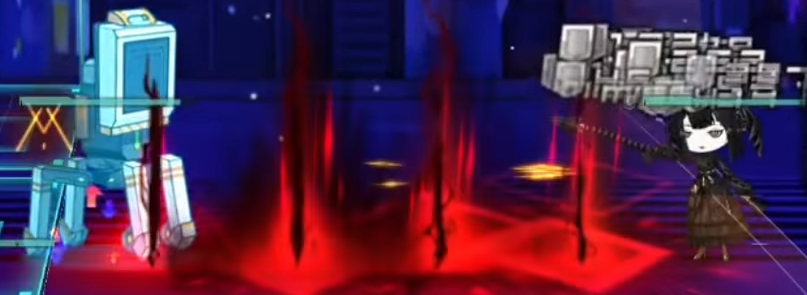
which won't do any damage to you. This is followed up by another attack, which is a laser that deals additional hits to targets that were marked. It'll deal damage to the entire row that she flies to.

Her other skill is Tide Of Apocalyptic.
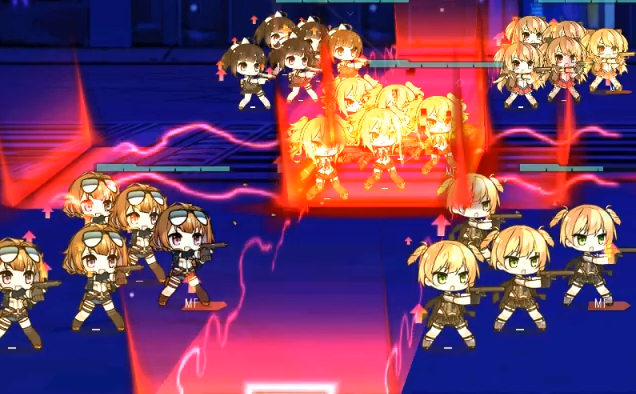
This skill picks a T-Doll via a warning tile, you can't escape it, that will be put into stasis. She will then summon a hologram of her that all your T-Dolls will focus.
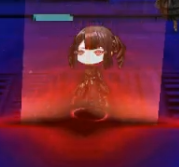
The stasis will pulse damage on the column and row the T-Doll afflicted by it is on, however it won't damage the stasis'd T-Doll. Do note that the afflicted T-Doll is NOT immune to damage, just the pulsing from Tide.
To get rid of this, all you need to do is let your T-Dolls kill the hologram. The main thing you need to do is minimize the damage done by moving your T-Dolls into whatever safe area you have. A good option for this is to spread out into an X formation as soon as the battle starts and moving as needed for the laser.
After killing her, you'll surround the enemy Command Center and you've cleared the map.
Note: The last drunk enemy that's required for the Hidden chapter unlock is located in this chapter at the information node here
Video of me clearing this map
Author: Kazuki
Tags: Va11-halla