


Transverse Sectioning EX/UX
Objective: Defeat the boss
Failure Condition: Boss reaches the marked Radar Tower
Recommended Echelon(s): AR/SMG (x2), Dummy with parachute fairy, dummy, 3 range HOC with decent fracture damage (AGS or Mk153)
This map has the added gimmick of locking down your movement if you try and move more than three nodes. The RO635 NPC echelon can provide immunity to the movement debuff, as well as clear it. She has a three node range to apply her buff to your echelons. Yes, you can use it multiple times per turn. I also believe that this map also has a gimmick where enemies are rooted in place for a turn if you engage them in a fight. I don't know this for sure, since I didn't make use of that at all for my clear, so don't quote me on that one.
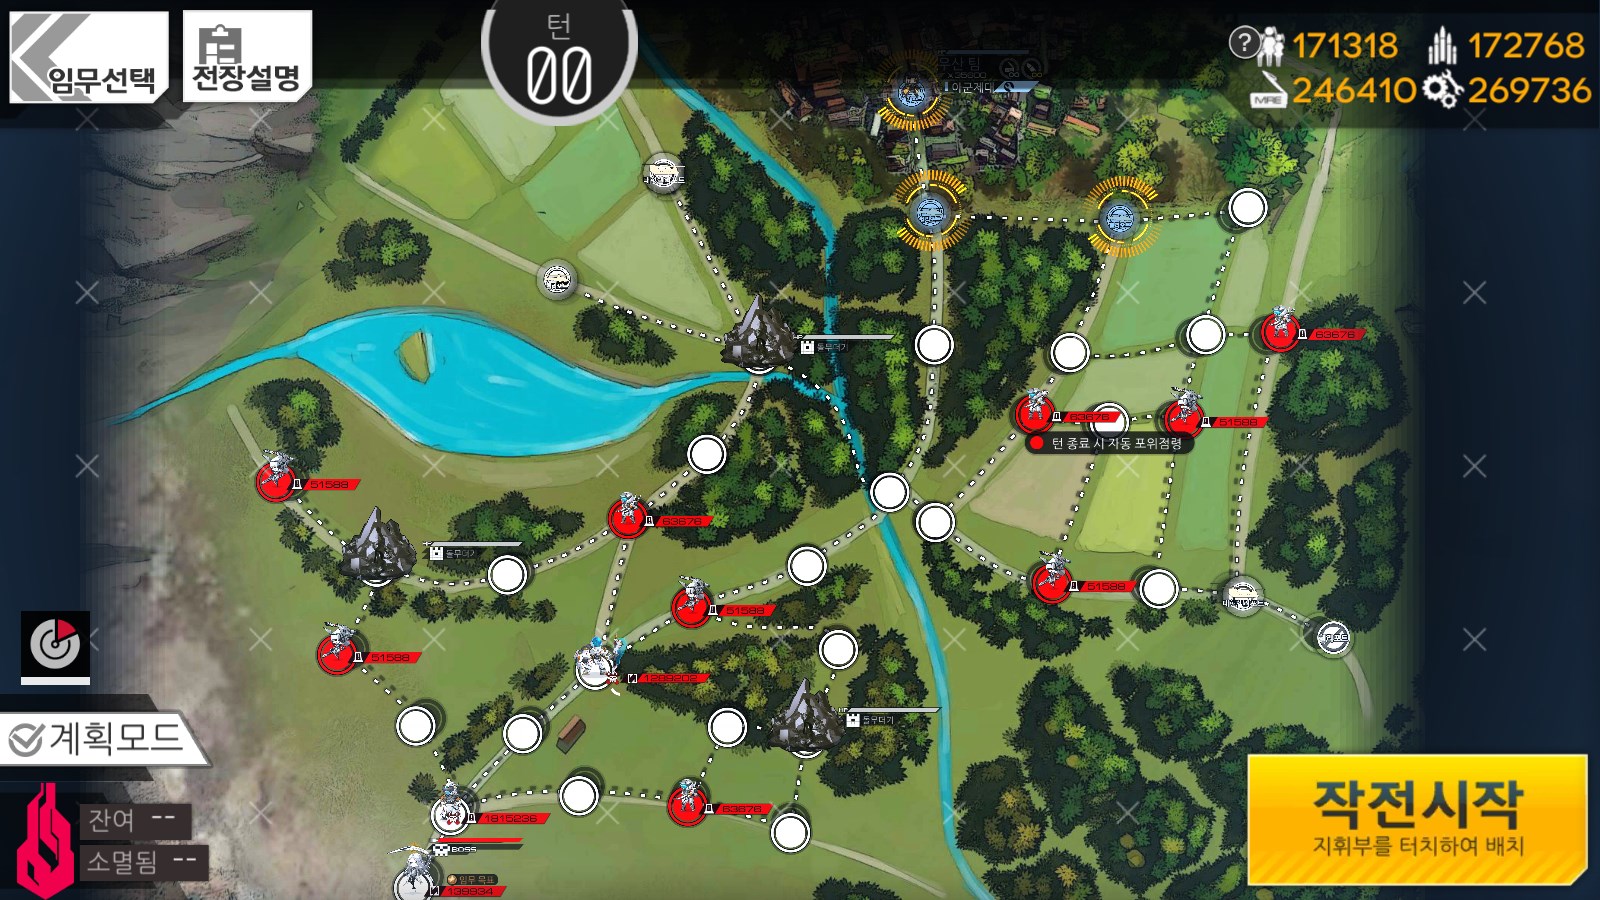
There's a few things we need for this map. One, we need HOCs to get around the death stacks to get to Grey. Two, we need a bunch of AP to accomplish that before she fucks off. So let's get started.
On turn one, we want to move over to the right side of the map. Normally we'd want to go there to get access to HOCs, but for this, we're just simply taking it for the AP. Deploy both your AR/SMG echelons. Have RO buff the one on the right Heliport, then move that echelon to the right, down, right, then down again so it's on the Heavy Heliport there. Deploy the dummy echelon with a para fairy and use it to parachute over to the other Heavy Heliport on the left of the map. End the turn here.
On turn two, we want to start off by retreating the parachute dummy off the Heavy Heliport. Deploy a HOC in its place so it can blow up the rubble that is blocking access to the rest of the map. Move the HOC down to where the rubble was. Next, apply RO's buff to the echelon below her and have that echelon move down three nodes. Deploy the dummy echelon you retreated at the Heliport below RO. Swap the two, and then move RO down two nodes, so it's next to your echelon. Deploy a dummy echelon with your remaining AP and end the turn.
On turn three, retreat the AR/SMG echelon that went to the right and redeploy it on the Heliport you just surround captured. Now we can set up to sneak an echelon through the death stacks.
Move your HOC down one node and have it blow up the rubble off to the left. Move your AR/SMG echelon you redeployed off the Heliport to the right. Swap your HOC with that AR/SMG echelon, then to RO, then to your other AR/SMG echelon. It should be in range to blow up the other bit of rubble. Do so, then deploy a dummy echelon at the Heliport on the left. We can use that dummy echelon to easily resupply the HOC, and if you needed more resources to continue destroying rubble, this lets you resupply for that as well.
Once both bits of rubble are cleared, we can move one of our AR/SMG echelons to the left towards the first rubble we cleared. You'll want to start off where we initially moved our HOC to on this turn. Go to the left through the Grenadier echelon until you trigger the movement lock. Bring the dummy echelon you deployed towards the echelon you just locked and have it chill there. Next, apply RO's buff to your other AR/SMG echelon and have it move to the left one node, then to the bottom right one node, then down one node. All this movement should have your HOC be chilling on one of your Heliports on the left, so move it to the right one node so it's where the rubble used to be. End the turn there.
Turn four is where we finalize the baiting. Move the AR/SMG echelon on the left to the left one node, then down one and engage the Rodelero echelon there. Move your dummy echelon down one node. Move RO to the left two nodes. Now, you have two choices here, you could leave your HOC there and speed things up a bit, or move your HOC to aid you with fighting Grey. If you don't care about that, we can have our right side AR/SMG echelon move to the left one node and we can end the turn there. If you DO want your HOC, we need to move it over. Move your right side AR/SMG to the left one node. Use RO to apply the buff to your HOC, then move it to the right of your AR/SMG echelon that we're using over there. Since you'll have had to swap with RO to get your HOC there, move her back to the left one node. If you want, you can clear the Grenadier this turn, but it's optional. End the turn here.
Turn five will have a clear path to Grey. Use RO to apply her buff to the AR/SMG echelon on the right. If you brought your HOC, apply it to them as well. Move your AR/SMG echelon straight to Grey. If you want your HOC, stop your echelon to the node just before Grey, then bring your HOC as far as your AP permits. It should just barely be in range and Grey will walk into you during the enemy turn. Killing her will clear the map. Do note that the fight will end when Grey hits half of her HP.
Video of me clearing this map
Author: Kazuki
Tags: Fixed Point