


DD Ranking Overview
DD's ranking map is, as always, unlocked by clearing out all the story maps. It's a 15 turn long map where you get points for meeting various objectives, and your highest scoring run is counted for ranking purposes.
Rewards#


- You will always receive gems and resources just for showing up, so there's no excuse not to run the ranking map!
- The fairy is kinda interesting, while her skill is useless, she's cheaper to enhance than other fairies, and her stats are solid.
- 9A-91 is already excellent without this unique equip, and it makes her even better. That said, she's still slightly worse than Groza, and Groza can be farmed from DD maps, so you should worry about her first.
Scoring#
With EN's run of Deep Dive, Mica pulled a surprise on everyone by giving it the scoring system they'd been using on newer events on CN/KR instead of the original one. That means you get points for:
- Establishing and holding supply lines (the longer you hold it, the better)
- Killing bosses (the more CE the boss has, the better)
- Killing other spawns (higher is better, again)
- And, newly, map control, which is evaluated at the start of turn 16, but before encirclements are calculated for your side:
- 10000 points for holding onto your CP
- 10000 points for the supply line starting point ("rally node")
- 10000 points for each supply point (obviously, must not been used)
- 2000 points for each heliport
- 500 for all other nodes
Note that you do not get a chance to encircle nodes at the end of turn 15.
CP and rally point are no brainers, you should hold onto them anyway to get supply line points. Because using a supply drop gives you an effective point reduction, avoid using them for your points. Luckily the map has enough heliports that this shouldn't be painful.
Heliport points give you 2000 points each, and there are 27 of them, but there are 15 of them that can spawn enemies, and all 15 of them can spawn an enemy on turn 14. Ideally, you want to have as many the helipads that can spawn enemies open for as long as possible, even up to turn 14, and you want to capture as many as you can on turn 15.
For the sake of kills, the original CE of an unit is counted, which means you get the full points for killing depowered Jupiters. Two of them can be safely encircled without messing with enemy spawns (see below), and the third can be encircled and killed on turn 15… or suicide charged, at that point it really doesn't matter.
The Map#
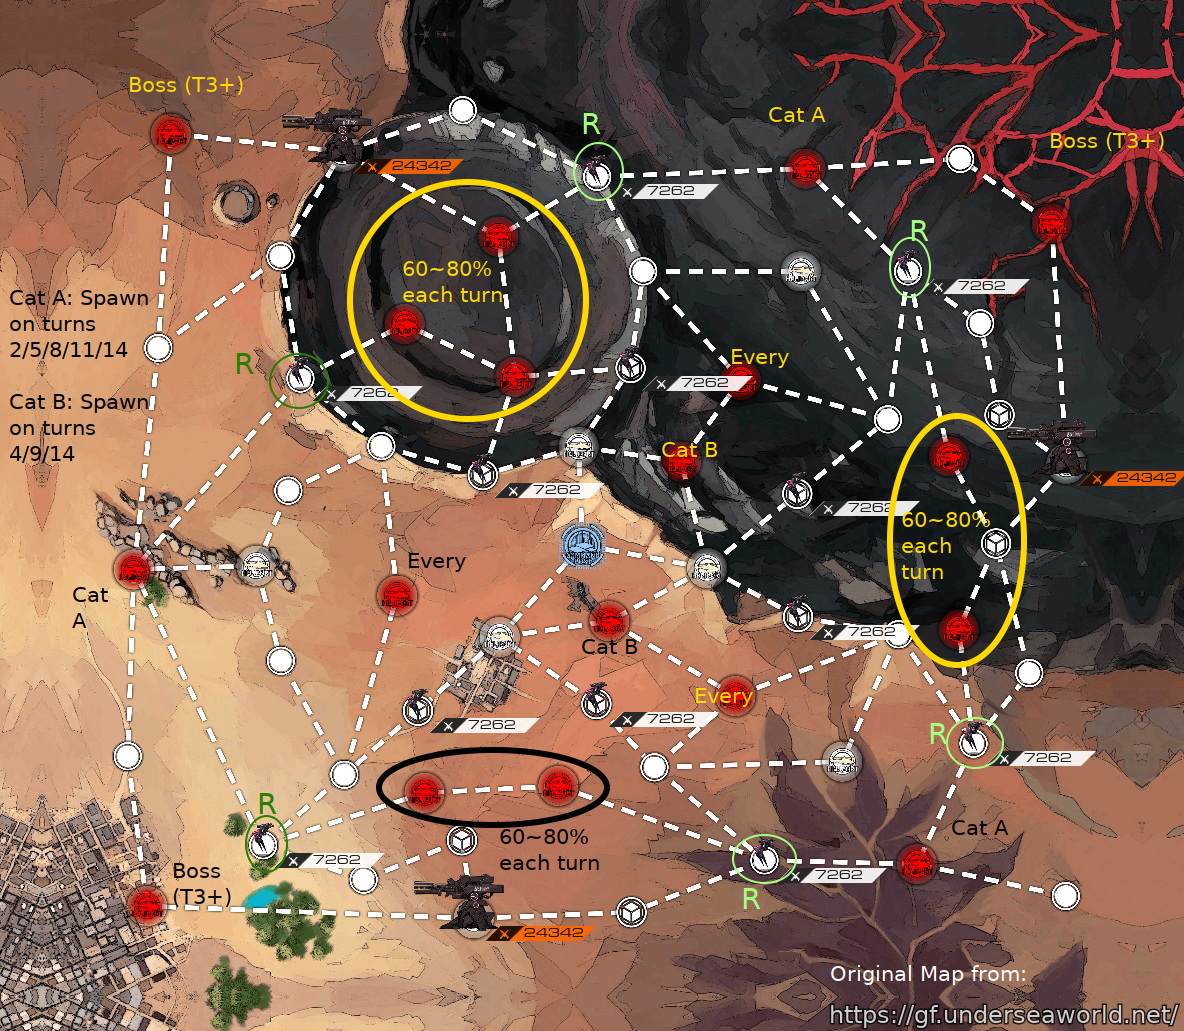
Lots of stuff here. Let's try to make sense of it:
- All the enemy held heliports on the start of the map can spawn enemies, if their turn condition is met and they aren't clogged. All the neutral ones won't and can be safely captured.
- The boss heliports are special: Bosses have a preferred spawn point and will be spread out over all of them, but by taking two of the three heliports, you can force them all to spawn on the remaining one, as long as it isn't clogged.
- The supply nodes are always next to a heliport (sometimes with a Jupiter sitting on it), so it's not a big deal not to be allowed to use them.
- Rally Points (potential supply line starting points) have scouts on them on map start. They're all 4 hops away from your CP and mostly it doesn't matter which you end up with. Those in the bottom right are further away from other map objectives, but it's not a big difference.
- There will be one rally point spawned on one of the potential spawns on the map at the start of the game, and it will move to a different node on turns 6 and 11. Establishing a supply line ASAP every time it switches over is going to be your highest priority.
Map Mechanics#
Other than the rally point mechanic (see above), there's not much going on here: Enemies will continue to spawn as long as they can, and try to interrupt your supply line, which you will obviously reject at gunpoint. Keep trying to kill as many of them as possible, and keep their heliports unclogged to make sure they continue spawning while you clear out the map and take as much of it as possible. That prepares you both for the map control scoring after the mission's end, and lets you potentially establish a new supply line on the same turn it spawns, which gives bonus points.
Boss spawns are the only other noteworthy mechanic: Starting on turn 3, enemy bosses will spawn as soon as you hit a threshold. Per turn, only one boss can spawn, so keep an eye on your kill counter and try to make sure you don't kill so many enemies that you skip over a threshold and miss a boss spawn.
- After 5, 10, 20 and 35 kills, one of either Scarecrow, Intruder, Hunter, Executioner, Gager or Alchemist will spawn on one of the un-occupied heliports. They are beefed up versions of their story counterparts, sitting at about 40k HP, high damage (180-250), low RoF (about 60) and average accuracy (about 100). This calls for evasive SMGs as tanks, to minimize the damage incurred by them. They also have reasonably high evasion (30-50) and little to no armour (0-40), so ARs are a good way to deal with them. If you can get them an accuracy boosting fairy, even better. They also have a bunch of adds, but mostly cannon fodder (Vespids, Rippers, etc.)
- After 50 kills, Sharkitect will join in, escorted by Manticores. Stats wise, Sharkitect isn't worse than the others, but her AoEs can be a pain. The Manticores are thankfully lightly armoured (29), so no need for AP ammo either.
- 65 kills gives us
MontgomeryDreamer, who is a bitch as always with higher HP (45k) and evasion (60!) than the earlier bosses, and to add insult to injury she's escorted by scouts. If it wasn't clear yet, don't bring MGs. Her first salvo is also bugged and will ignore a taunt fairy dummy. - 80 kills spawns Gaia, and this time, she isn't a pushover. Compared to E3-4, she has more than twice the HP (75k!), more armour (30) and evasion (50), and retains her extremely painful AoEs. As with Dreamer, her first salvo is bugged and will ignore a taunt fairy dummy.
- 100 kills spawns the final boss,
GarmCerberus. While it isn't a pushover, it retains the rather boring and easy mechanics of the story version. That means an SG can tank her just fine, especially if you pile armour buffs on her. Garm is also accompanied by a total of sixteen x5 linked Dinergates and Tarantulas, just in case you weren't convinced of the necessity of machine guns yet.
For non-boss spawns, you'll see quite literally everything in the book. Anything from Manticores to Brutes to Dinergate swarms to Jägers.
Recommended echelons#
Given the enemy compositions outlined above, what you want is a mix of ARSMG and MGSG echelons, with the usual recommendation being at least 3 of each, better 5. Cerberus is the only ones that really want MGSGs, so you can pad out your roster with rifle echelons (ideally RoF RF) if you're short on MGs, but you better have a taunt fairy for them to tank. Realistically, you'll want to have one good ARSMG echelon to handle bosses, one good MGSG echelon for Cerberus (and tarantula swarms if you don't have airstrike fairies), and the rest to be able to handle the fodder.
Parachute Fairies#
Are obviously interesting on such a sprawling wide map, but their debuff is crippling even at skill level 10 and so you'll have to be careful with them.
With one fairy, you can start capturing the supply line from both ends at the same time, which lets you establish it much more rapidly – there will be a neutral heliport 2 tiles away from any rally point that you can drop to, and you can get a guaranteed Turn 2 supply line on 3 out of 6 Rally Nodes. (More will be detailed in the Additional Tactical Hints section)
A second parachute fairy gives you several options: You can use it to move an echelon from your CP to an adjacent heliport on turn one to save yourself one AP and get closer to establishing the supply line, while allowing you to deploy 3 echelons on turn 1. Alternatively, you can parachute to a boss heliport to better spread out your echelons and start sweeping enemies off the map faster.
If you have a third parachute fairy you can eat a bag of dicks. :< Deploy it for whatever option you didn't pick for your second airborne.
Any more than that is not just obscene lucksackery, but also most likely counter productive, as you're not gaining much from another debuffed echelon in bumfuck nowhere. You're better off bringing a fairy that's useful in combat (taunt, airstrike, etc.)
Additional Tactical Hints or something like that#
This section is provided to give some insight on how to run the map. Because of the random spawns, random enemy movements and the random rally node position, getting identical runs is almost impossible. What is possible, however, is to set up stratergic goals and tactics before and during your run to improve your performance.
Terminology#
Most of the things here are written right when they come into mind without actually checking what I wrote before, so here I wrote some stuff to clear some of the things up. Terminology used in-game such as Rally Point, Supply Node and Supply Line will not be mentioned.
| Helipads | Heliport |
| Command Base | Command Post |
| Enemy Spawn Helipads | Any Helipad that can spawn any non-boss enemies. |
| Cat A, Cat B | Enemy Spawn Helipads marked with [Cat A] or [Cat B] in the map provided abovel |
| Random Spawn Helipads | Enemy Spawn Helipads that has a 60-80% chance of spawning a unit. |
| Guaranteed Spawn Helipads | Enemy Spawn Helipads that will always spawn a unit every turn. |
| Creeps/Spawns | Non-boss, non-jupiter enemies. |
| Tiles/Nodes | Nodes on the map. |
Actual Tips start here#
- Do note that the points you get from holding the supply line is given at the start of the next turn. This means two things.
- Firstly, surround captures will not lose you any points as you have created the supply line RIGHT BEFORE your next turn.
- Second, losing the supply line to enemies at the enemy's turn 5/10 will lose you points as the rally point changes on turn 6/11 AFTER the points would be creditted, if you had the supply line.
- Make sure you understand what you can handle. If you do not have a full 10 echelon roster, capturing some spawn tiles early will help you massively by giving you more AP and less enemies to play with.
- While you do lose out on some points, it is sometimes better to have that than have creeps all over the map such that you cannot maintain a helipad at a good position.
- Additionally, because spawns get stronger later into the run, having weaker spawns block stronger spawns will impact your point gain.
- Also, having enemies all over the map makes it hard to capture tiles for the points in the end of turn 15, as enemies will recapture tiles when you move away form whatever you captured.
- Even if you have a full 10 echelon roster, securing some enemy spawn helipads early to reduce the chaos is a good tactic if you aren't sure you can handle all of them.
- The more tactically skilled you think you are, the riskier you should try to play (to maximize your points). Do note, however, that risky plays are risky and can completely screw over your control of the map.
- A single mistake can snowball into many non-ideal actions, so always be careful with taking risks.
- While you do lose out on some points, it is sometimes better to have that than have creeps all over the map such that you cannot maintain a helipad at a good position.
- You want to spread out your echelons. Enemies spawn all over the map and you want to kill as many units as possible to prevent clogs.
- You want to capture and secure all the non-enemy-spawn-helipads, as they will give you spots to resupply your echelons.
- You only need 2 echelons to secure any position with a helipad, and you only need up to 5 echelons (less for most rally nodes) to secure a supply line.
- Often times, you can use MUCH less echelons to hold a rally node.
- The shortest supply line for every rally point is always: [Command Base] - [Helipad] - [Supply Node] - [Blank Tile] - [Rally Point]
- The [Rally Point] will always need an echelon on it, because it is always adjecent to a Random Spawn helipad.
- The [Blank Tile] is always adjecent to a Guaranteed Spawn, and it is adjecent to a no-spawn helipad for all except for the [Bottom Left] and [Left] Rally points. .
- The [Supply Node] does not need to be held at all except for the [Left] and [Top] rally points, as it has no spawns adjecent to it.
- The [Helipad] is adjecent to a CAT B helipad, which means that you only need to hold it on turn 4, 9 and 14. However, it is still useful to have an echelon here for swap resupplies.
- Holding a full line with 4 units means that you can always have all units resupplied. Additionally, any other echelon and move adjecent to any point of the line and swap all the way back into the [Helipad] for resupplies. This can be a VERY convenient tactic.
- Alternatively, if you are holding only the [Rally Point] and the [Blank Tile] (at any rally point except for [Bottom Left] and [Left] Rally points), you can resupply both echelons for free if you can move an echelon to the no-spawn helipad right beside it.
- Do note that the tactic is only "free" if you have an echelon in the area that you needed to resupply anyways. Without an echelon that needs to resupply, you need 4 AP to resupply the two echelons.
- You do not always need to return to a helipad at the end of your turn. One tactic is to have an echelon move out and kill enemies at the start of one turn, then move back to a base at the end of the next.
- Another tactic is to have wandering echelons that move between the helipads while killing off enemies in the paths. This is especially useful if you have a few especially strong echelons and want to have them fight more enemies.
- As with all tactics, judge whether if it is AP efficient to use it and whether you want to have that echelon in the ending position at that turn before you actually apply that tactic.
- You can, and should use your Parachute Fairy more than once. It has a 5 turn cooldown and you can reuse them on turn 6 and 11.
- Other than saving AP for securing rally nodes, it can also help save AP to capture a far-away helipad, as you can now choose to move only 1 Echelon towards the helipad you want to secure and Paradrop the second enchelon in for the capture.
- However, do not that the echelon will be out of commission for that turn, and the next. Don't use the Parachute fairy if you are even in the possibility of a fight.
- If you get a Supply Line capture on Turn 2, you can get extra points (should be 8750). This is possible with most rally points if you have 1 or more Parachute fairies. However, if you instead spend your turn 2 deploying more echelons, you can get extra echelons out for extra AP, or even secure additional positions for a better long-term plan.
- Securing extra positions or having extra AP will allow you to do more things earlier, and open up better tactical options during battle, but whether doing so will be worth the 8750 points loss is still very debatable.
- The extra points you get at the end of the enemy's Turn 15 makes things very complicated. This is because by turn 15, enemies give 2k-3.5k per kill, while each helipad only gives 2000 points.
- This means that in an ideal scenario you want to kill the Turn 15 spawns over actually capturing the helipads. However, this does not work in practice due to a few reasons.
- Each helipad has 2 or 3 exit points.
- You have to cover a total of 16 tiles to block all exit paths of all 3 guaranteed and 7 random spawns.
- If there are enemy spawn helipads adjecent to each other, enemies can walk to another enemy spawn helipad instead of walking out, rendering point 2 moot.
- Even if you use 2 echelons to secure a helipad spawn, you only get 1000-1750 points per echelon used, whereas capturing 2 helipads will give you 4000 points guaranteed (or 2000 per echelon).Reminder that you do not get a chance for encirclement captures on turn 15 as well.
- The complexity comes when you include spawns in turn 14. In turn 14, every non-random enemy spawn helipad will spawn an enemy, giving you 8 guaranteed spawns and 7 random spawns.
- Because you can only capture 10 tiles per turn, if you leave all 15 helipads open (for maximum spawns), you have to leave 5 helipads uncaptured, which will lose you 10000 points.
- Additionally, on turn 14, enemies that spawn from the 15 helipads will move around and capture surrounding tiles that you cannot recapture.
- There are even 3 helipads that can spawn enemies that can recapture a Supply Node, forcing you to spend 1 echelon to capture it for the 10k points, and losing you an extra 2k points.
- Leaving the 5 helipads open on turn 15 can also cause extra spawns to happen, which may recapture some tiles. This can be avoided entirely by capturing the 3 guaranteed spawn helipads and all random spawn helipads. (Cat A and Cat B helipads no longer spawn enemies)
- Finally, because you need to capture one of the spawns to de-power the top left Jupiter, you will want to have a Jupiter Busting echelon or lose 2k points from the helipad and 2400 points from the jupiter.
- [4D Chess] However, if you surround some helipads at the end of turn 14, you can have the enemies spawn before a capture happens, allowing you to get maximum spawns while capturing all helipads... But you need 12 echelons to capture all 5 surroundable helipads, and you still open up an enemy spawn that can capture some of your supply nodes...
- Alternatively, you can try to close some helipads on turn 14. You will lose kills that cost 2k-3.5k per kill, but you will not risk enemies recapturing important tiles on turn 14.
- This is definitely the safer choice with more room for errors and mistakes, as well as more AP to play with and less enemies to deal with... but it may cost you some points you needed to get the top rankings...
- In fact, you can close off a few Cat A and Cat B helipads early if you don't plan on dealing with turn 14 spawns and turn 15 captures.
- Because you can only capture 10 tiles per turn, if you leave all 15 helipads open (for maximum spawns), you have to leave 5 helipads uncaptured, which will lose you 10000 points.
- This means that in an ideal scenario you want to kill the Turn 15 spawns over actually capturing the helipads. However, this does not work in practice due to a few reasons.
- Busting Jupiters is much more AP and Echelon efficient. You need less AP to move your echelons to surround it, and you need less echelons in that area to surround capture it.
- The top left Jupiter requires the least AP and Echelons to surround. However, you cannot surround capture the Jupiter at the top left without capturing a random spawn.
- The top right Jupiter requires more AP and Echelons to surround (to capture and hold the tiles you need to surround it). Additionally, it is very easy to mistakenly surround the random spawns there.
- The bottom left Jupiter requires the most AP and Echelons to surround. Additionally, there are very few objectives there for all the echelons stuck in the area.
- While all of them is possible to do in a run, it is much cheaper to bust through all of them with a few AP and 1 echelon, leaving these limited resources to secure other objectives.
Parachute Fairies#
There are 6 possible rally node spawns. I will call them [Top], [Top Left], [Bottom Left], [Bottom Right (Bottom)], [Bottom Right (Right)], [Top Right].
Every Rally node has a non-enemy-spawn helipad 2 tiles from the rally node. Every Rally node has a [Cat A] helipad right beside it.
With 1 Parachute fairy, all Rally nodes can be captured on Turn 3. Paradrop to any helipad (does not matter), spawn a second echelon and move it to any adjecent helipad. On the next turn, spawn a total of 3 echelons to secure the command base and all 3 surrounding helipads. You now have 10 AP and you only need 9 to secure any Rally Point.
[Top Right], [Bottom Right (Right)] and [Bottom Right (Bottom)] can be captured on turn 2 with 1 Parachute fairy without interrupting enemy spawn helipads.
- On start, Paradrop Echelon 1 onto Non-enemy-spawn-helipad. Spawn Echelon 2 and capture the helipad closest to the Rally node. End Turn.
- After enemy turn (3 Helipads 2 Echelons), move Echelon 1 onto the Rally Node (2 AP). Spawn Echelon 3 on Paradrop Helipad, and move 1 tile towards the rally node (2 AP). Spawn 1 echelon to protect your command base (1 AP).
- At the end of the enemy's turn, you will surround and capture the last tile of the path.
- Note that this does not work on the [Top] rally node because the tile you need to surround now has a Enemy Spawn helipad beside it.
[Bottom Left] can be captured on turn 2 with 1 Parachute fairy using the above tactic, but you have to capture the [Cat A] helipad instead
[Top] can be captured on turn 2 with 2 Parachute fairies.
- On start, Paradrop Echelon 1 onto Non-enemy-spawn-helipad to the right of Rally Node. Spawn Echelon 2 and Paradrop it to the helipad above command base. Spawn Echelon 3 on Command base.
- After enemy turn (7 AP), Move Echelon 1 onto Rally Node (2 AP). Spawn Echelon 4 on Paradrop Helipad and move 1 tile towards Rally node (2 AP). Move Echelon 2 one tile up (1 AP). Spawn Echelon 5 on top of helipad above command base.
[Top Left] can be captured on turn 2 with 3 Parachute fairies and the [Cat A] node. Honestly, if you want a turn 2 capture, just reset for a different rally node.
Author: Chiaki Matsuda
Tags: Autism Nobody Asked For This Ranking