


Leveling Guide
Due to popular demand, here's a leveling guide. Starting with the normal leveling process, then onto other special methods of leveling.
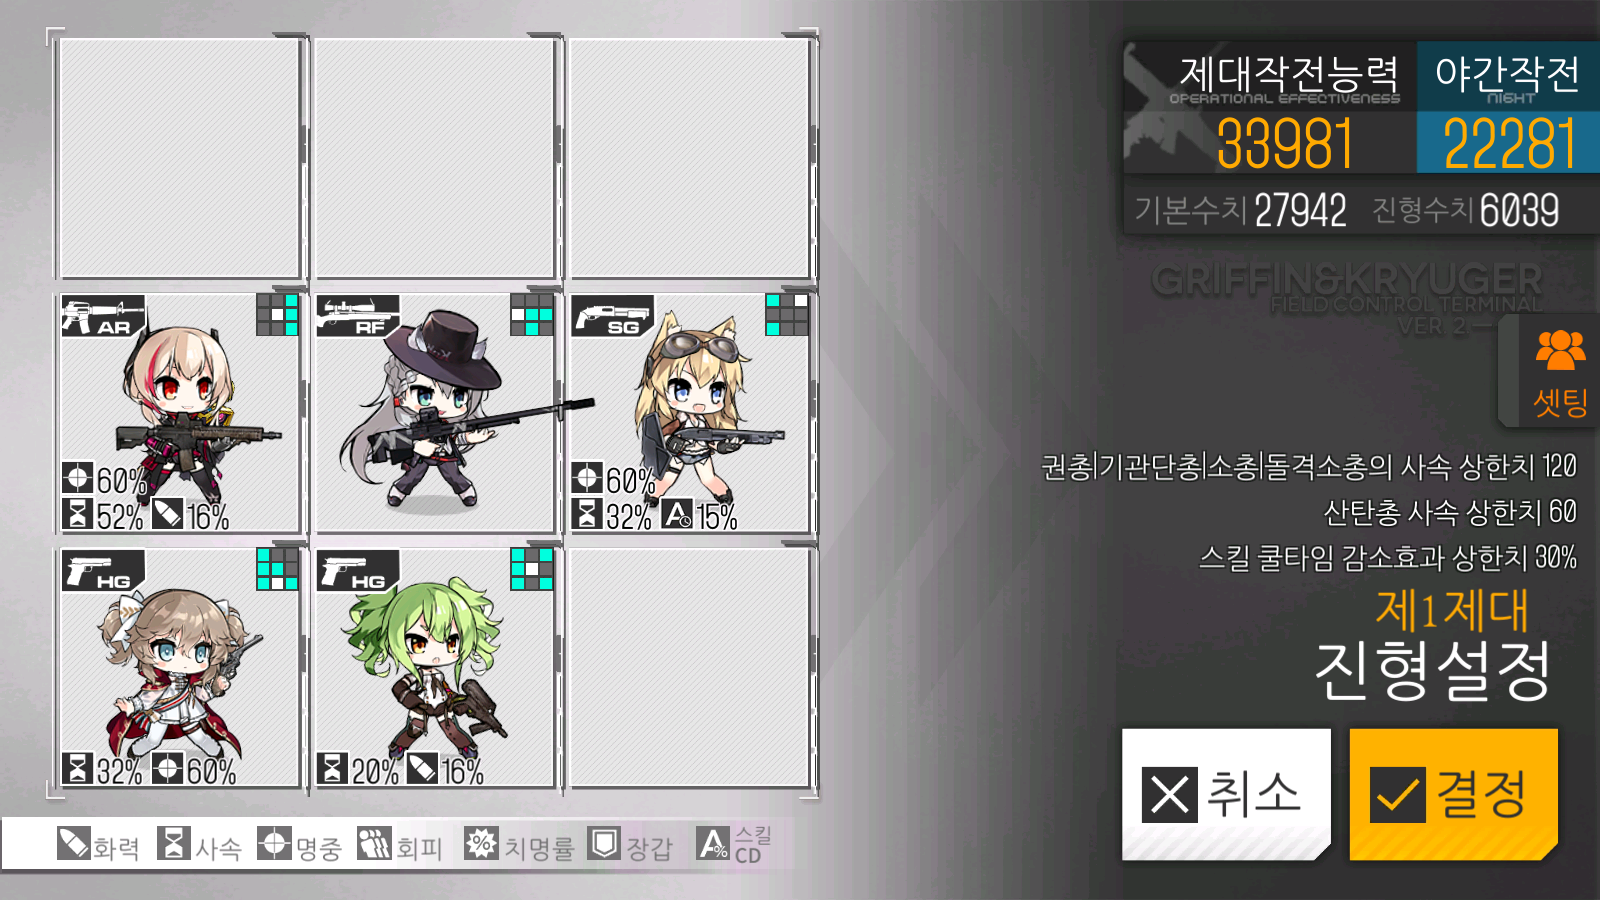
To start with, you want to make two echelons. First is your leveling echelon. This will hopefully be combat viable for the map you're clearing. For a new player, you should be using an AR/SMG team, so you want to be using an F formation. This looks like this:
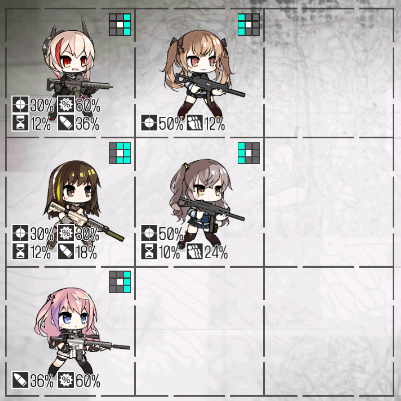
It's a nice and safe formation that requires enemies to run up to you, allowing you to shoot them before they shoot you.
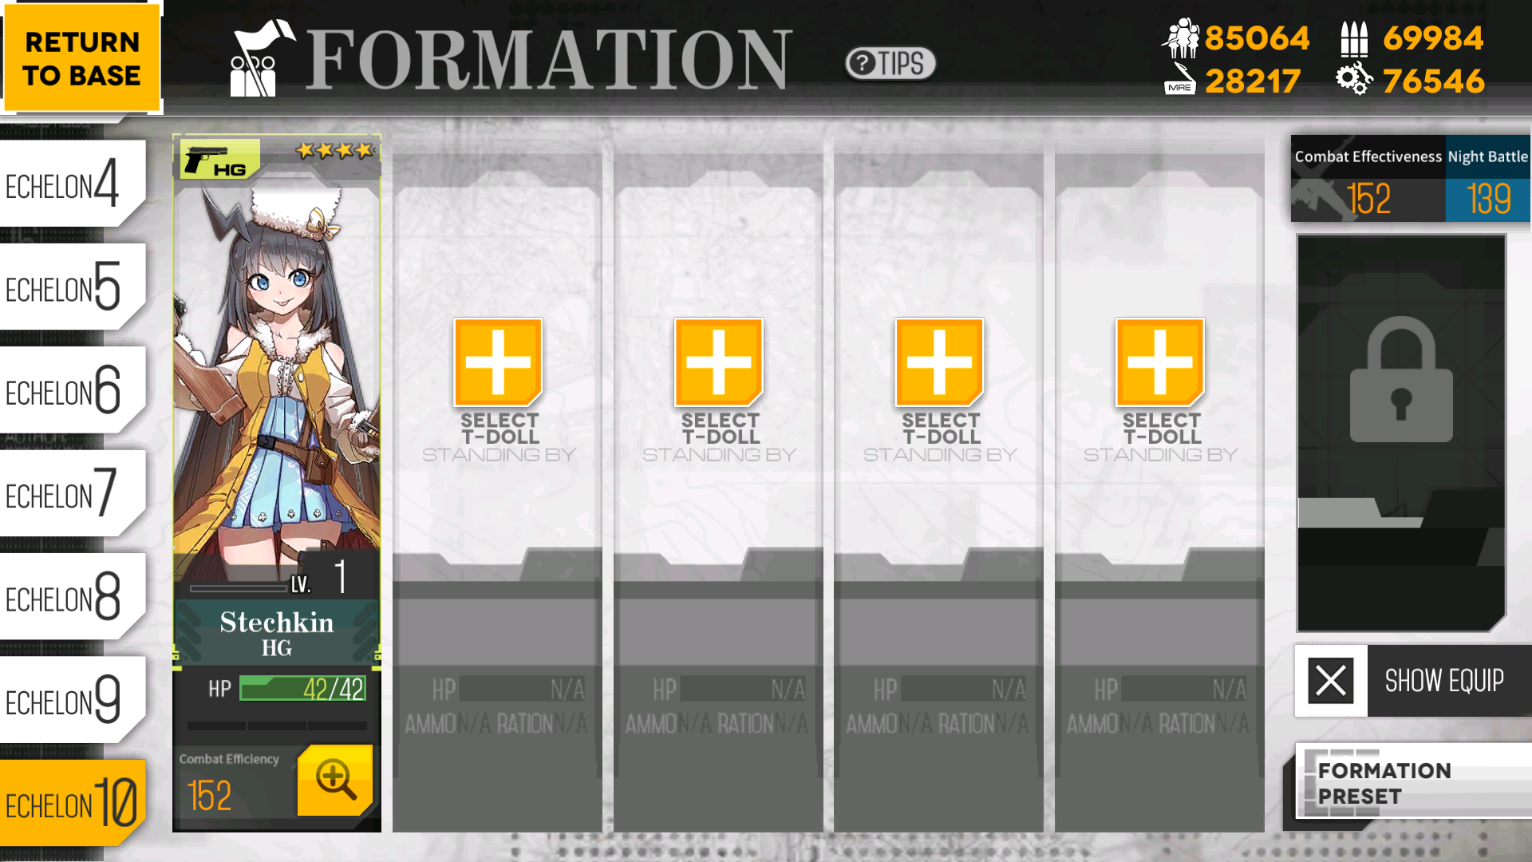
The second echelon you need to make is a dummy echelon. This is a simple echelon that only has one unit, typically a handgun, used for AP (Action Points) or to have your leveling echelon start in other places aside from your Command Center. It will also be used to be left on the map when you terminate missions on certain maps.
Example:
That's everything you need going into the normal leveling process for your first echelon.
Note: If I have "e" next to the map number, it refers to the emergency version of the map.
Note 2: The level range means it's recommended to start around that level. The end number doesn't have to be when you move on to the next map. It just means that you'll get an exp reduction starting with that level.
Note 3: There are exp bonuses for the leader of your echelon (the first T-Doll in the formation) and the MVP (most damage done in a battle).
Starting off through the game, you should be able to progress easily to the first leveling map just with the exp gained from clearing the story to it.
2-3: 15~30#
The first leveling map you'll really be doing. It's a nice and simple one turn clear, which is what you're looking for in a map to grind. For each of the maps, follow the planning mode's checkmarks to see the route to take.
Requires a dummy echelon.
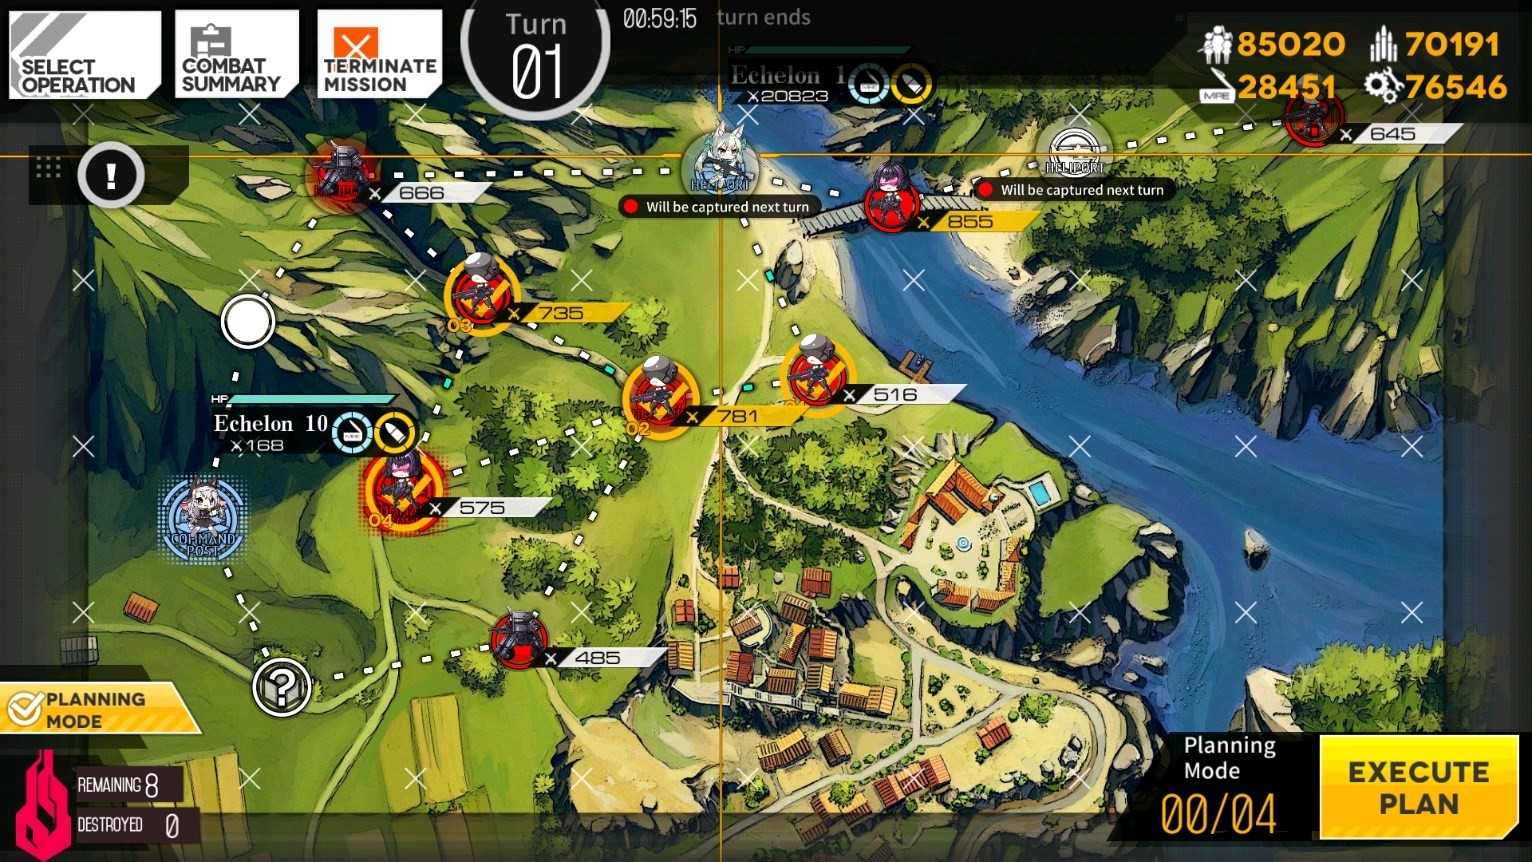
If you can't clear all four of the enemies, you can go directly to the enemy Command Center after the 781 power enemy.
3-5: 30~50#
You'll be doing this map until you can access and clear 4-3e. The earlier you can do that, the better. 4-3e has more exp and has a decent chance at cores.
Requires a dummy echelon.
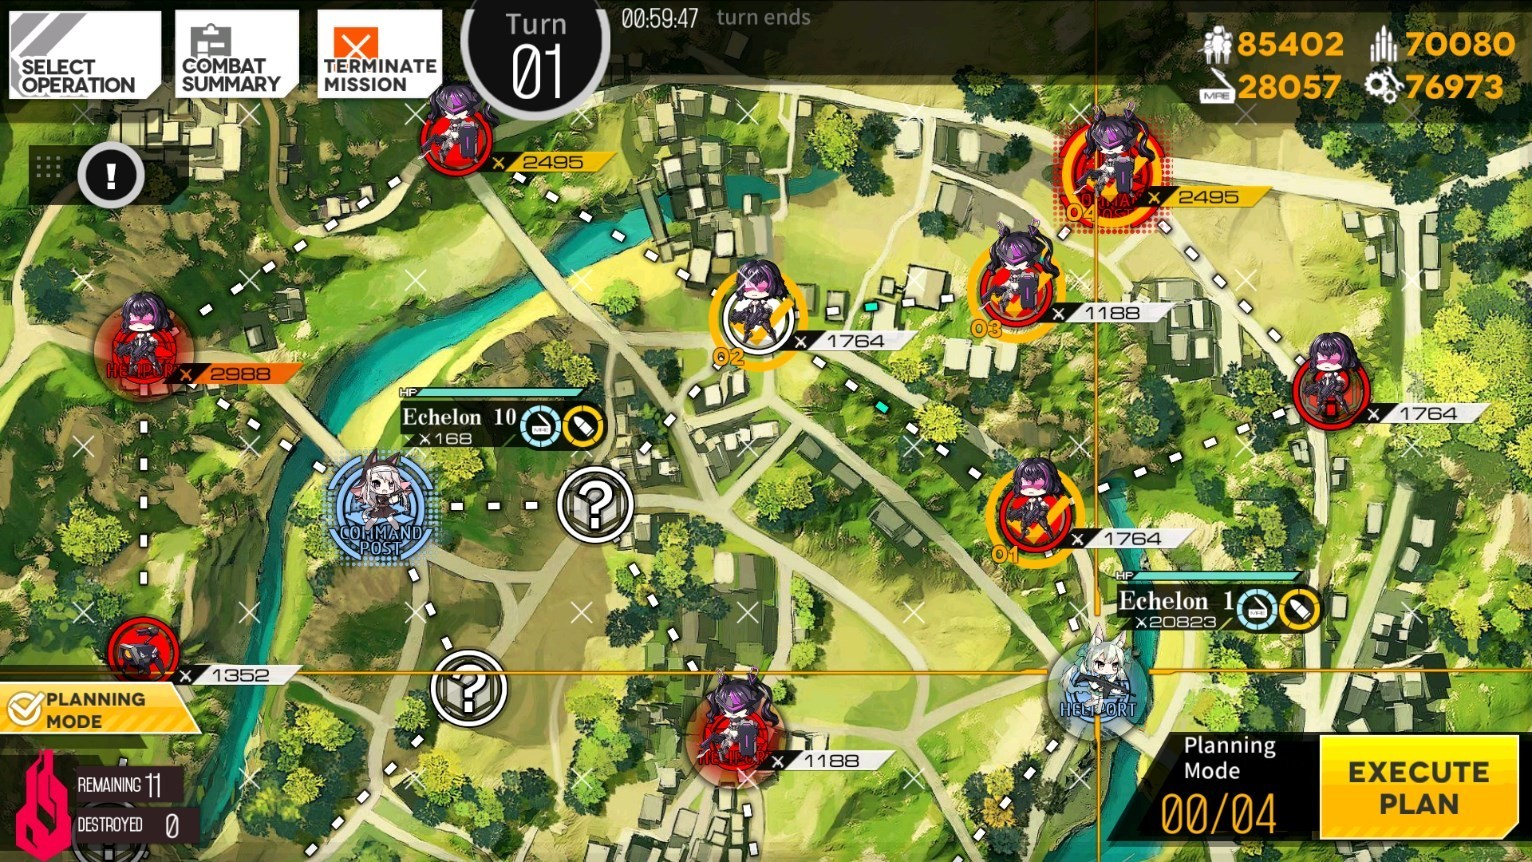
Like 2-3, if you can't handle all the enemies on that route, you can go to the right of the 1764 power enemy and only take three battles instead of four.
4-3e: 40~75#
Get comfy, you're going to be here for awhile. The amount of exp you need per level goes up a good amount when you get into the 50s. You want to be sporting some 4x dummy links going into the next leveling map. For this map, you want to adjust your formation so it's a forward F, due to the Jaguars (the mortars) in this map. Example:

You have to be forward to kill them before other enemies come into firing range. If you don't kill them, your backline will get hit.
Requires a dummy echelon.
5-2e: 70~88#
The next stop in your journey up the levels. Like 4-3e, you'll be liable to be here for awhile. However, the core rates seem to be better here, which helps out a lot with the costs of 5x dummy linking things at Lv 90. If need be, you can stay here until Lv 90, but try to move onto the next few maps relatively sooner than that.
Requires a dummy echelon.
Like earlier maps, if you can't deal with all the enemies, you can skip some of the enemies. Either the two at the bottom or the 4108 power enemy at the start. But, if you can't clear those, it's recommended that you just stick with 4-3e until you can. The power of this map is that you get a full five enemies per clear of the map, maximizing the amount of enemies you can kill in one turn.
0-2: 88~100#
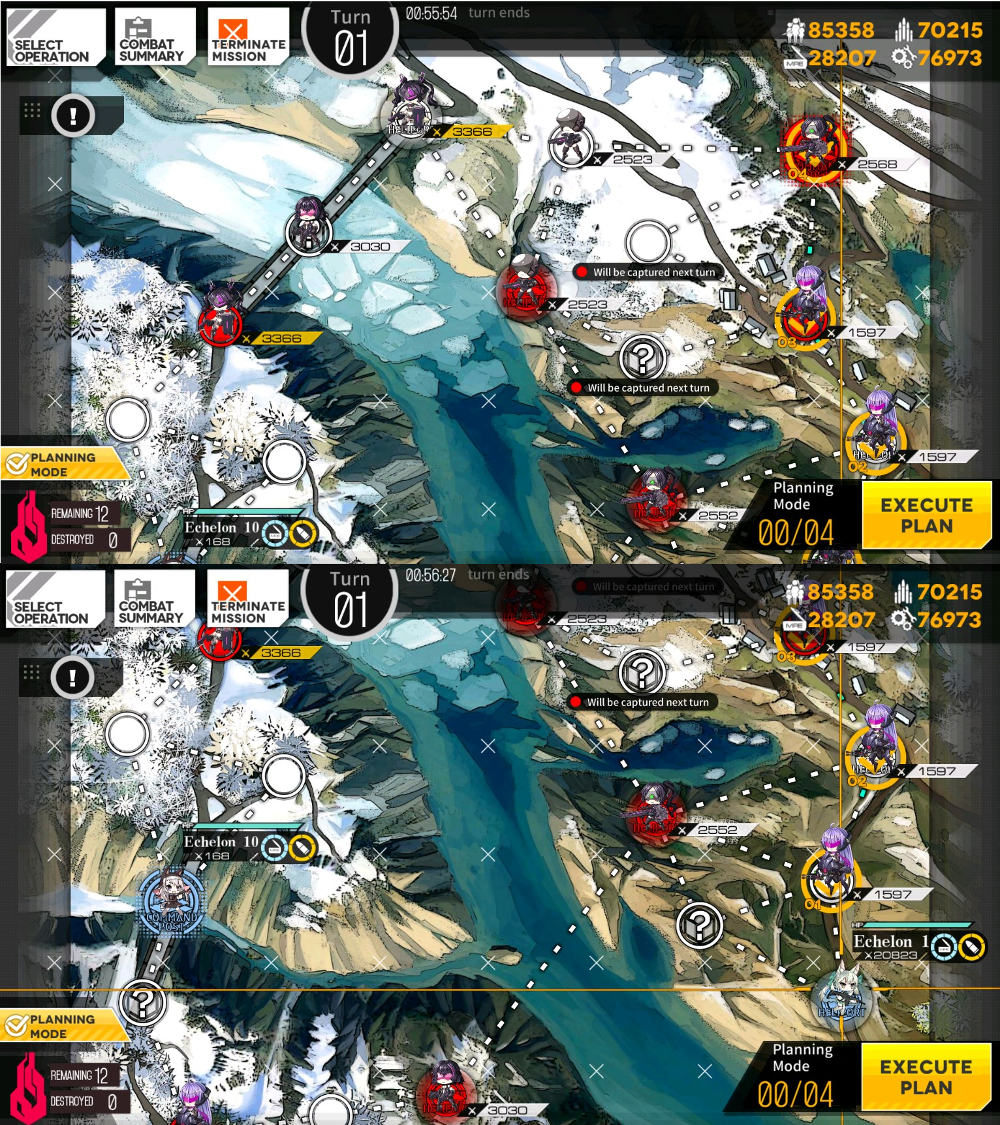
The big map which most people grind at. You'll be doing this too, since 0-2 has a pretty high core drop rate, and can drop PK, one of the big four MGs. Despite it being a two turn clear, you're in no danger of losing your Command Center, as the enemies on this map do not move at all. This map is also friendly to the special leveling method that will be discussed after this section.
You'll want maybe one or two 5x dummy linked units going into this so you have enough damage to clear the map.
Like the two maps prior, this map also has a Jaguar in it which promotes the use of a forward F formation.
Requires a dummy echelon.
Turn 1:#
(Turn 2)
 #
#
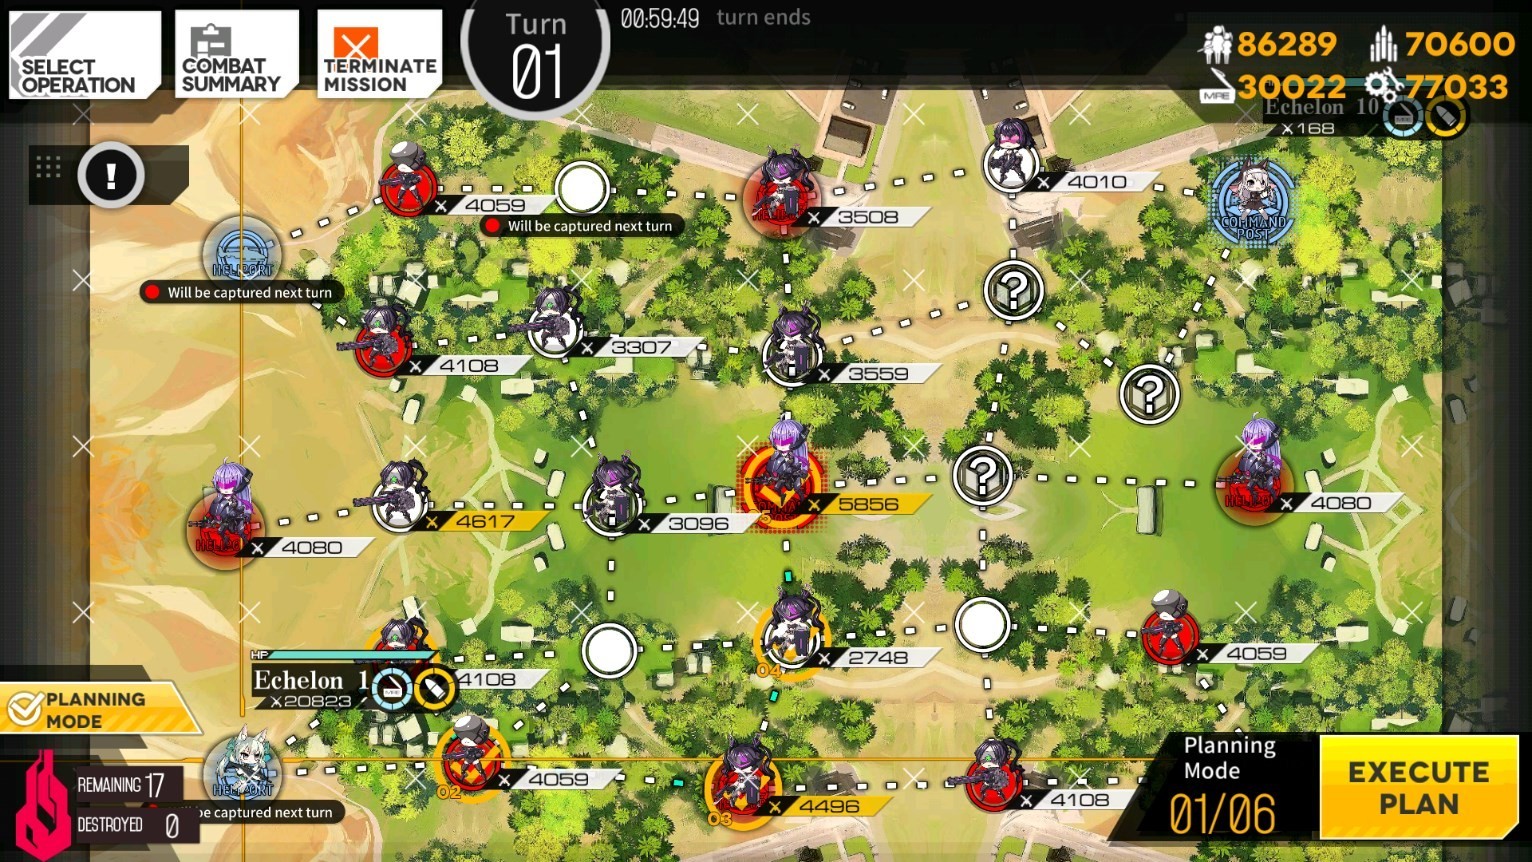
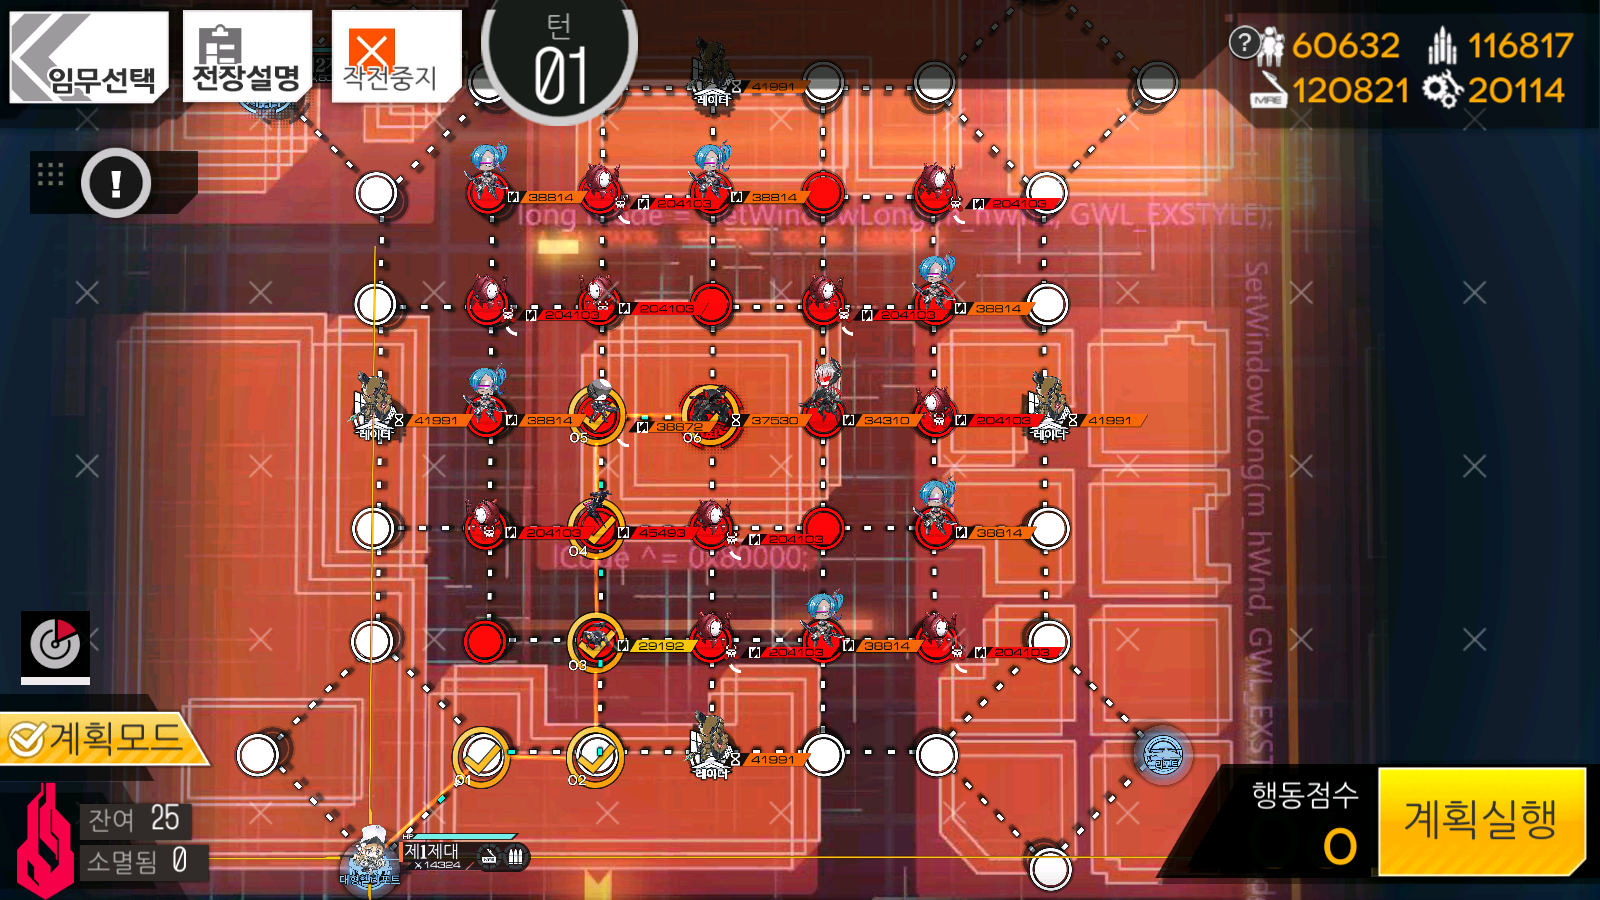
0-4: 88~100#
It's a one turn clear that gives the maximum amount of exp you can get per battle. The idea for this map is that you spawn on the top heliport and clear five enemies, then stop at the right heliport to retreat. After that, you terminate the mission and restart it.
Requires a dummy echelon.
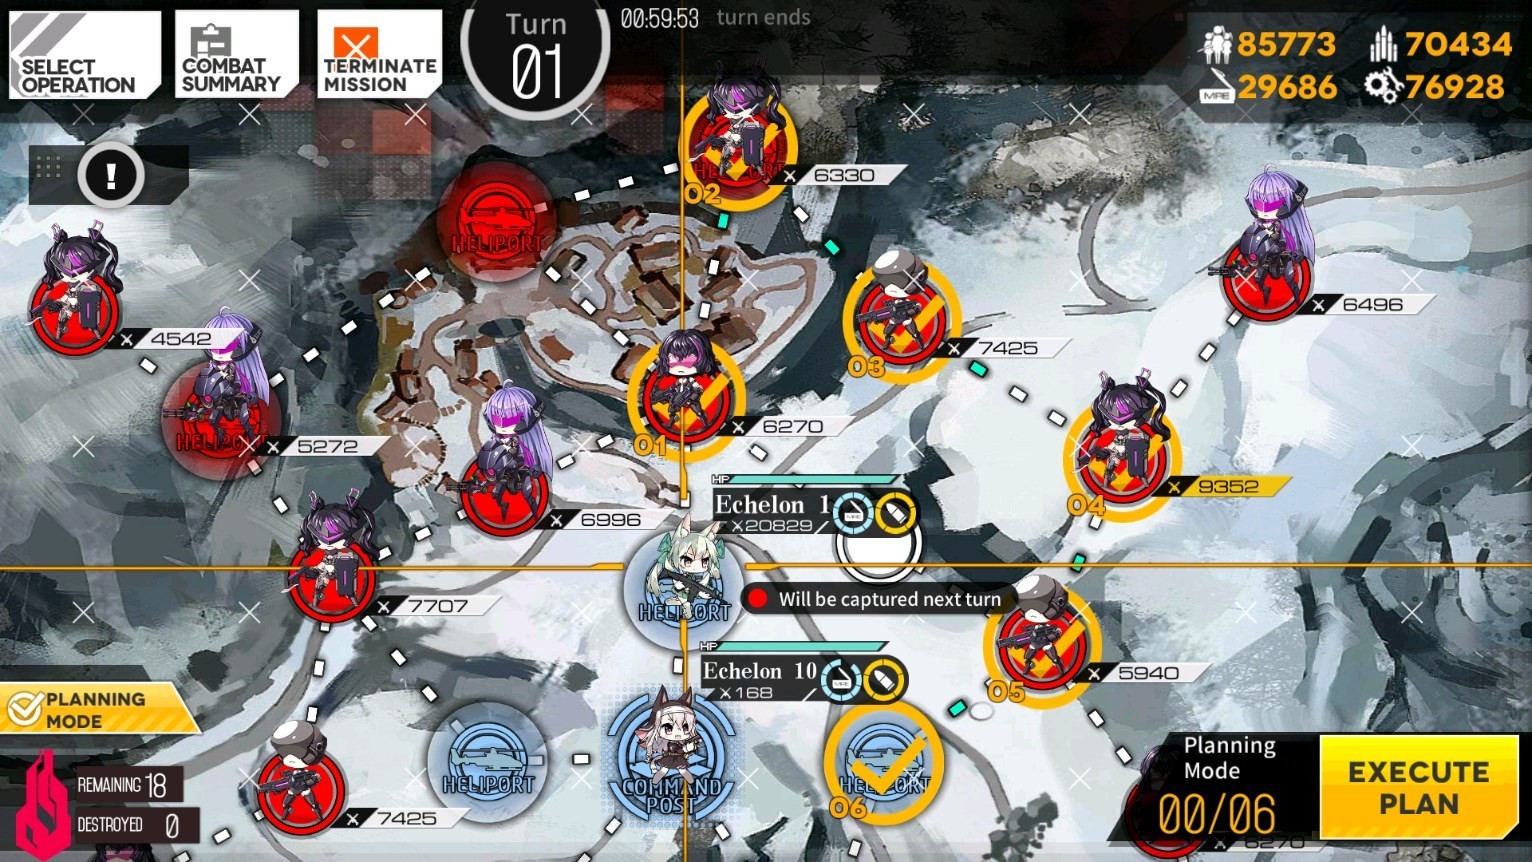
Sometimes the retreat function likes to bug out, so I would recommend to resupply before retreating. I haven't encountered the bug yet when I do that.
6-3n#
These level range things are kinda less useful when you're corpse dragging. So I'm gonna remove them.
See the zas dragging guide for how to do this.
8-1n#
See the zas dragging guide for how to do this.
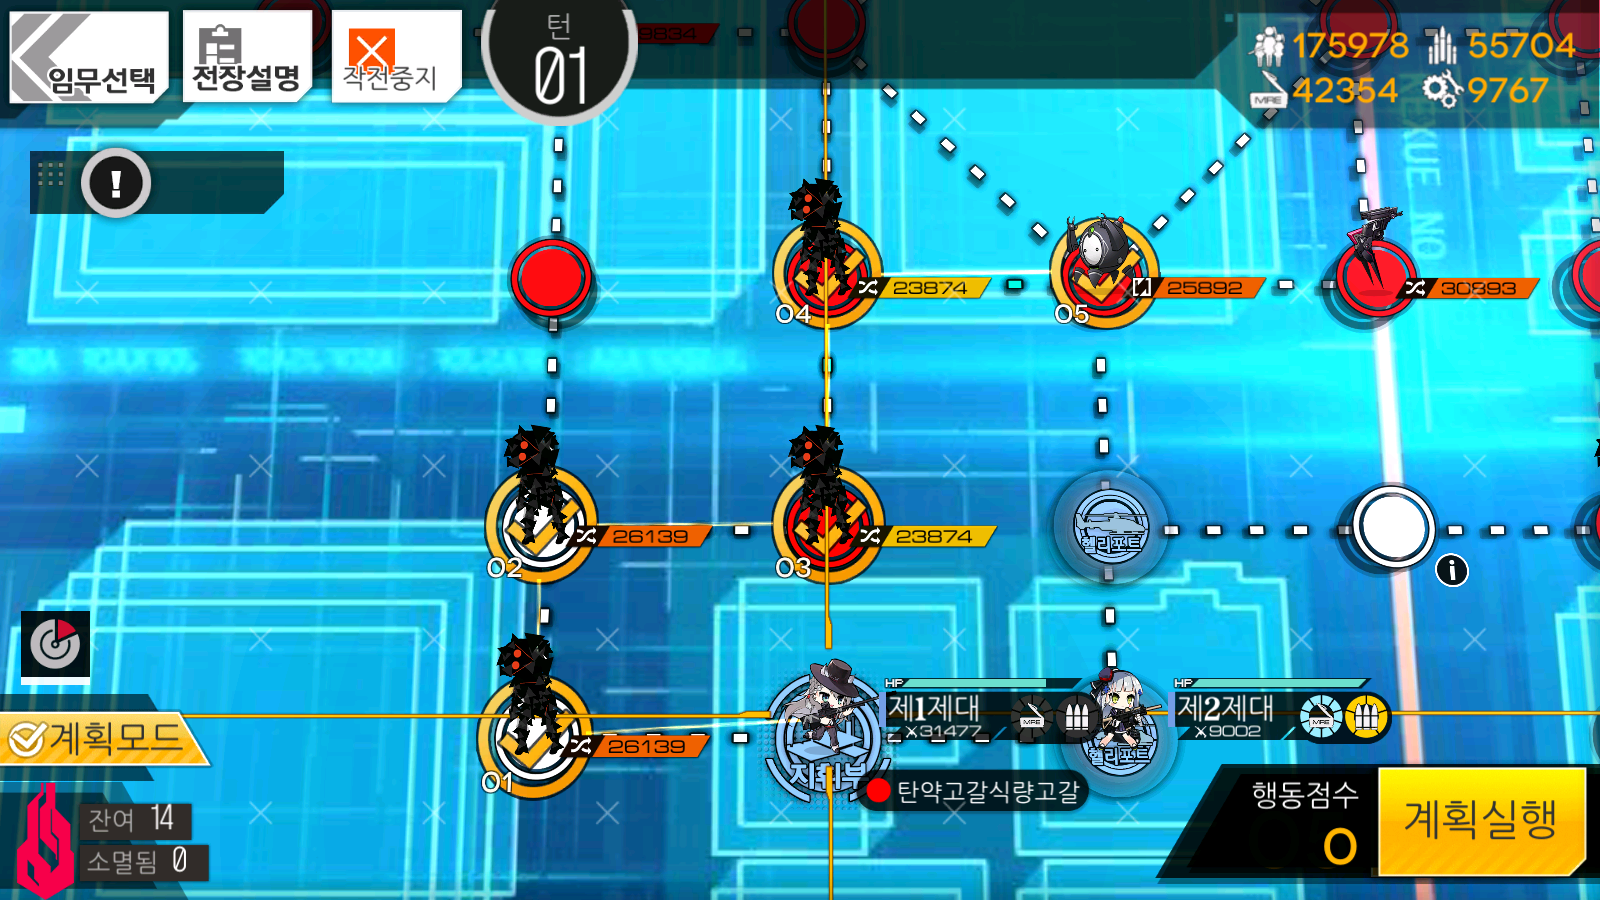
11-5#
Wow its been so long since a new exp farm map has come out in EN that isn't zas dragging. But here we are in 2020 with ch 11 out. The max exp note from 0-4? Yeah that's old news. We get 550 exp base from this map and to add to that, for leveling mods, we don't have any exp reduction from levels. The big issue with this map is that the dps requirements are pretty strict. If you do choose to level here, you'll likely need to use handguns for buffs as well as some decent fairies. (Note this is for corpse dragging) Additionally, you have to use a different formation for this map.
We want the top row to be clear to make sure a Golyat doesn't hug us to death. If your DPS is low, the unit at 2 may get its face eaten, so don't leave anything there that's too weak. Note, you can also have your grenadier on 5 if you so wish for buff tiles. Nothing really changes.
As for what to use for this? You have a few options in EN currently. Sopmod II mod is the best option, she straight up destroys this map. Your other option for corpse dragging this? Uhh......You have 416 and FAL currently. Both can do it, but they both need a ton of help from fairies/buffs. You'll need to do like 18k or so damage before the Golyats in the last fight walk off screen to kill them. They take like (THIS MEANS I ESTIMATED THIS) 11 seconds to walk off the screen and with damage variance, reaching the minimum damage isn't quite enough to make sure you always clear the fight. You'll want to aim for around 21k damage going out in those 11 seconds for a more consistent clear. Sop easily reaches this with a little help, but 416 and FAL struggle with it. What? You don't know how much damage you're outputting? Use a combat simulator to figure out.
A good metric for if you can do it is "do I have 2~3 hg buffs as well as a 3* or higher fairy that gives firepower?" If yes, you can probably do this safely. Lower? Questionable clears.
The rest of the fights? They're pretty easy. Nightmares(the data zombies) are extremely slow, do low amounts of damage, and group up really well for grenades to end them. Having a shotgun tanking (or M16) will let you grind for hours without having to repair. You still do need some good grenade damage to handle them properly. Because of how easy these are, the requirements to kill them are much lower. It is entirely possible to say "fuck efficiency" and hardheadedly bash your head into 11-5 if you just do the four nightmare fights and skip the Golyat.
Ultimately I want to make a note that this is NOT the be all end all leveling spot prior to 12-4e. There's pros and cons to this map and you may want to move to 8-1n instead of this if it suits you better.
Video of this drag:
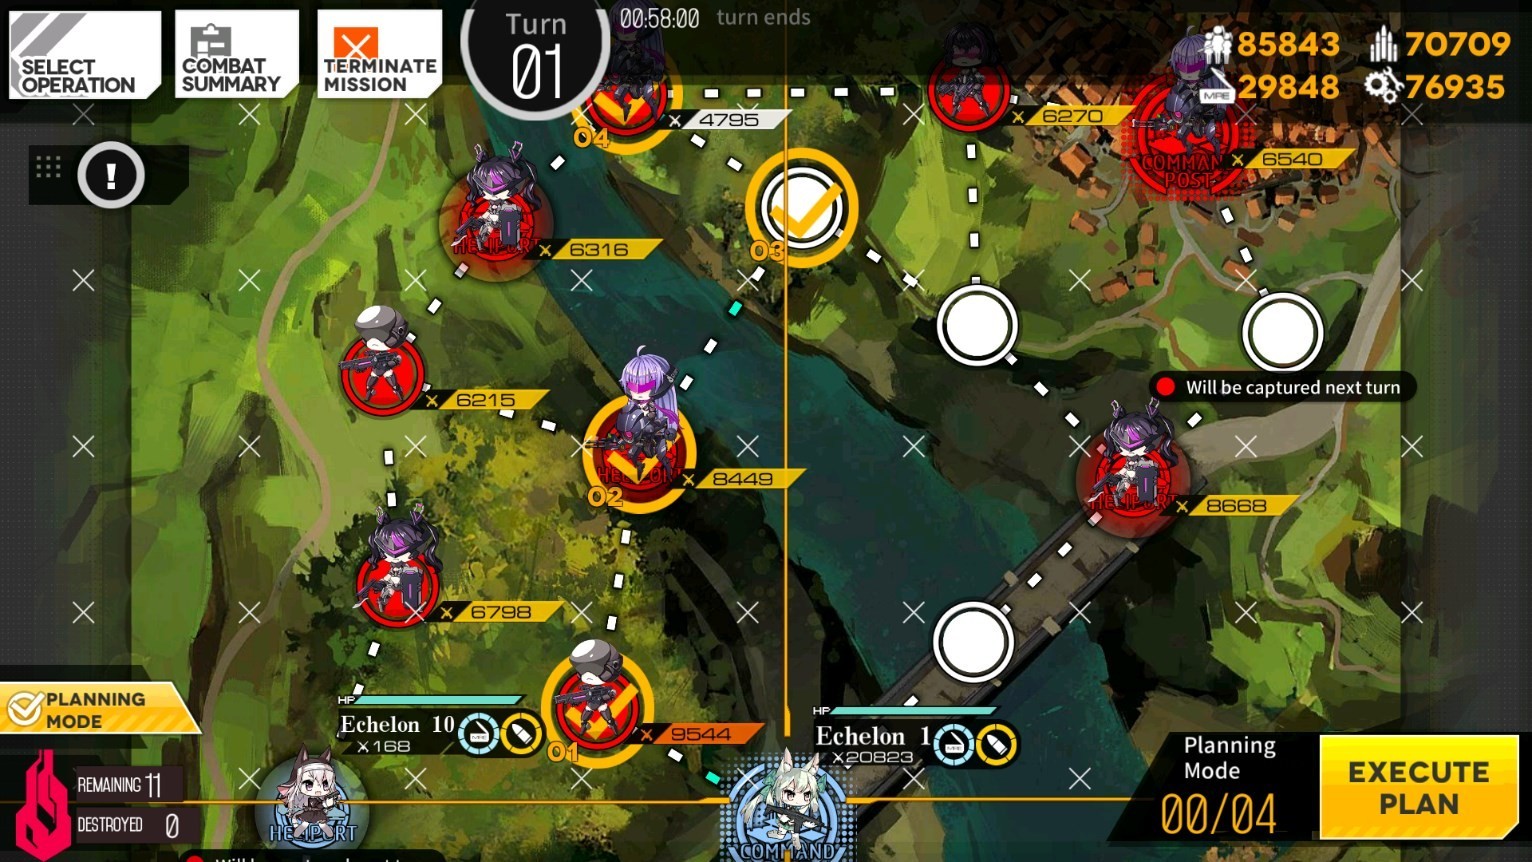
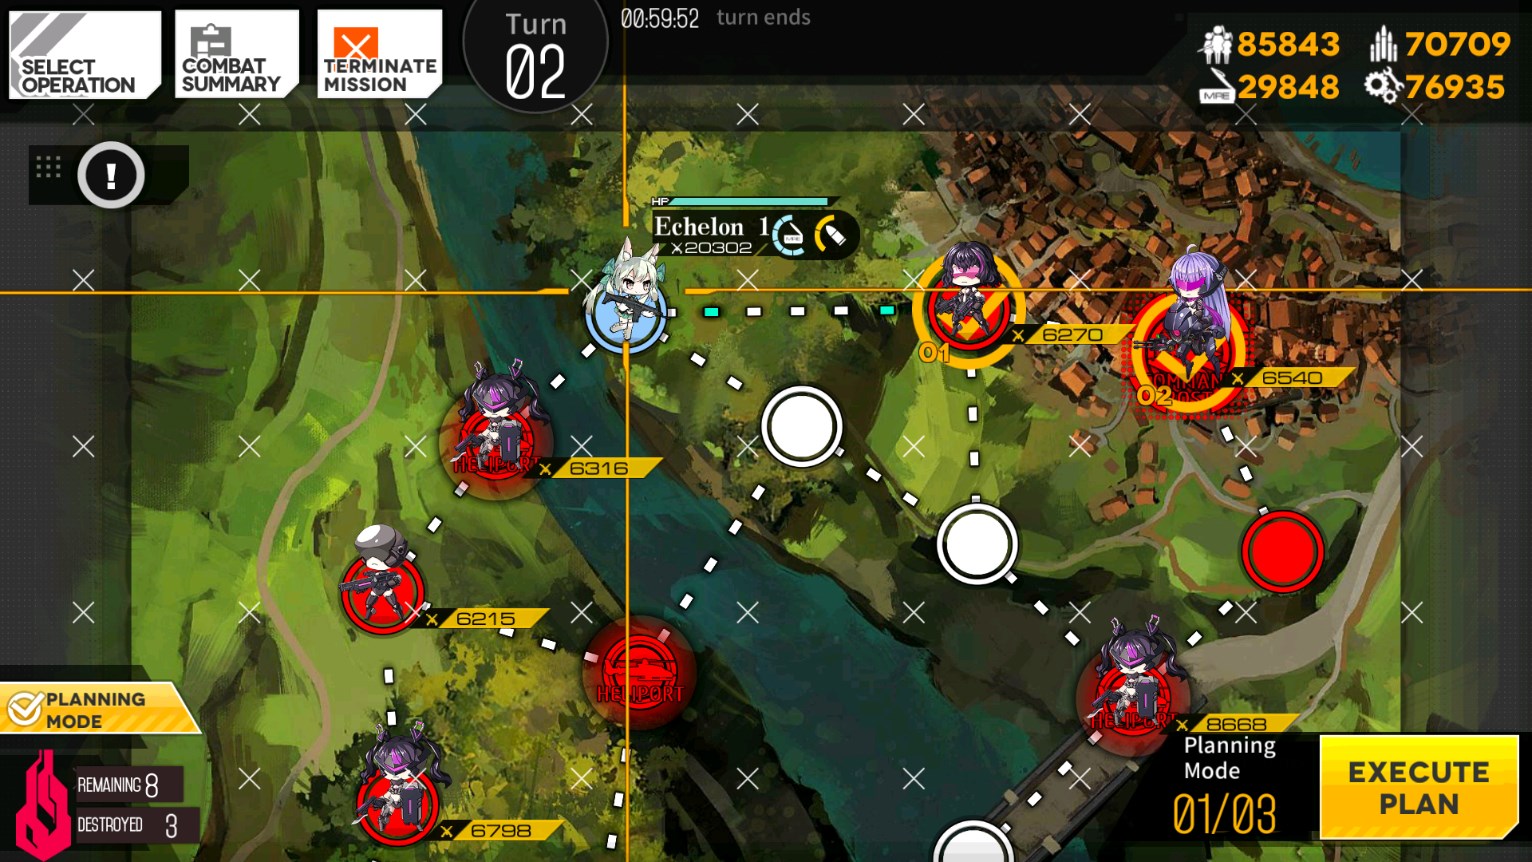
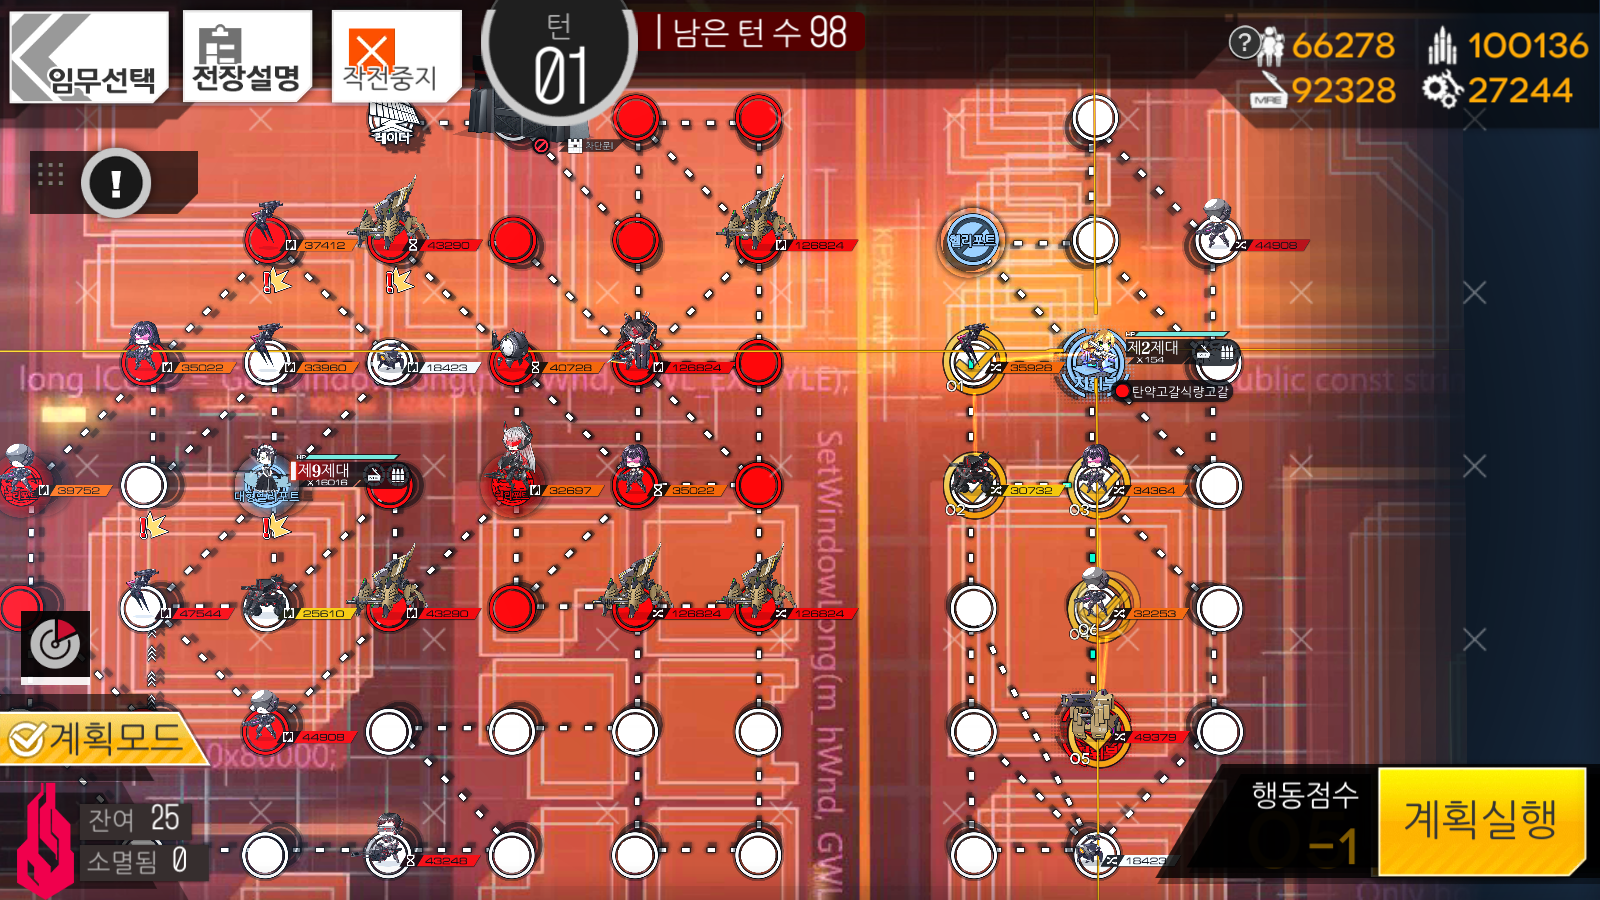
12-4e#
I forgot to add this and no one reminded me, so here it is. This is basically 0-2 but way better. You get a good rate of cores while also getting fast exp with less requirements than 11-5. One of the best dragging spots. 12-4e gives us a whopping 600 base exp a kill, 50 more than 11-5.
For 12-4e, the ideal draggers are 2x 416 mod. Yes, all you 416 simps can finally rejoice that she's not trash for something. You can use other units like Sop2 or Micro Uzi (please don't use Uzi), but it doesn't match up to 416 mod. The reduced icd is very good for this. You'll want to set up in a b formation with your shotgun on 5, like so:
The pathing looks like this:
Thankfully, unlike 11-5, this map doesn't have too high of a stat check, so you can play around to see what works for you stat wise. Just know that if you don't use 416 mod, you'll likely take a good bit more damage than if you use her.
Here's a video of the run, if you're super curious:
13-4#
You know 12-4e? Yeah, this is 12-4e but you use molotov SMGs and it's faster. The rates are similar for exp cores, but due to the overall speed of the clears, this is much faster for exp/hr and core/hr.
You have a few options for draggers, but the ideal is a single link Vector. You can also use Micro Uzi mod and she'll perform better, but single link Vector is the cheapest. The idea is that all the enemies in 13-4 are stacked up on top of each other, so the early icd of a molotov will destroy them before they can do anything. That's why you can use a single link Vector. The primary thing you're concerned about in this drag is the FP (and obviously skill level) of the doll doing it.
There is one thing to note though, the FP requirement for this drag is actually variable. This is due to the movement speed of the echelon. Arriving at the enemy earlier means that there's a longer period of time where they can fire upon you. Thus, I can't give you a solid FP requirement for this drag. However, there IS a calculator that can figure out what kind of FP you need!
Calculator for 13-4: https://tempkaridc.github.io/gf/vec.html
This does calculate for Vector only, though. So when using other dolls such as Micro Uzi, be aware of that.
Anyways, how about formations? This drag is fairly freeform when it comes to formations. I've seen a multitude of things used, C formation, P formation, b formations, L formations, whatever fits the bill. I typically just use C or P.
And lastly, we have the pathing for this drag:
Video of this drag:
Corpse Dragging/Beggar Runs/I'm poor please help me#
This is the special method of leveling I mentioned at the beginning. The concept behind this method is that you have a solo DPS (typically an AR) carrying an echelon that doesn't get supplied. This way you're only supplying one unit's worth of resources.
The way this is done is by using two units, both strong enough to solo the map, and swap between them. You'll be resupplying the unit not in use via it being the dummy echelon. Do note that you need to turn off this:
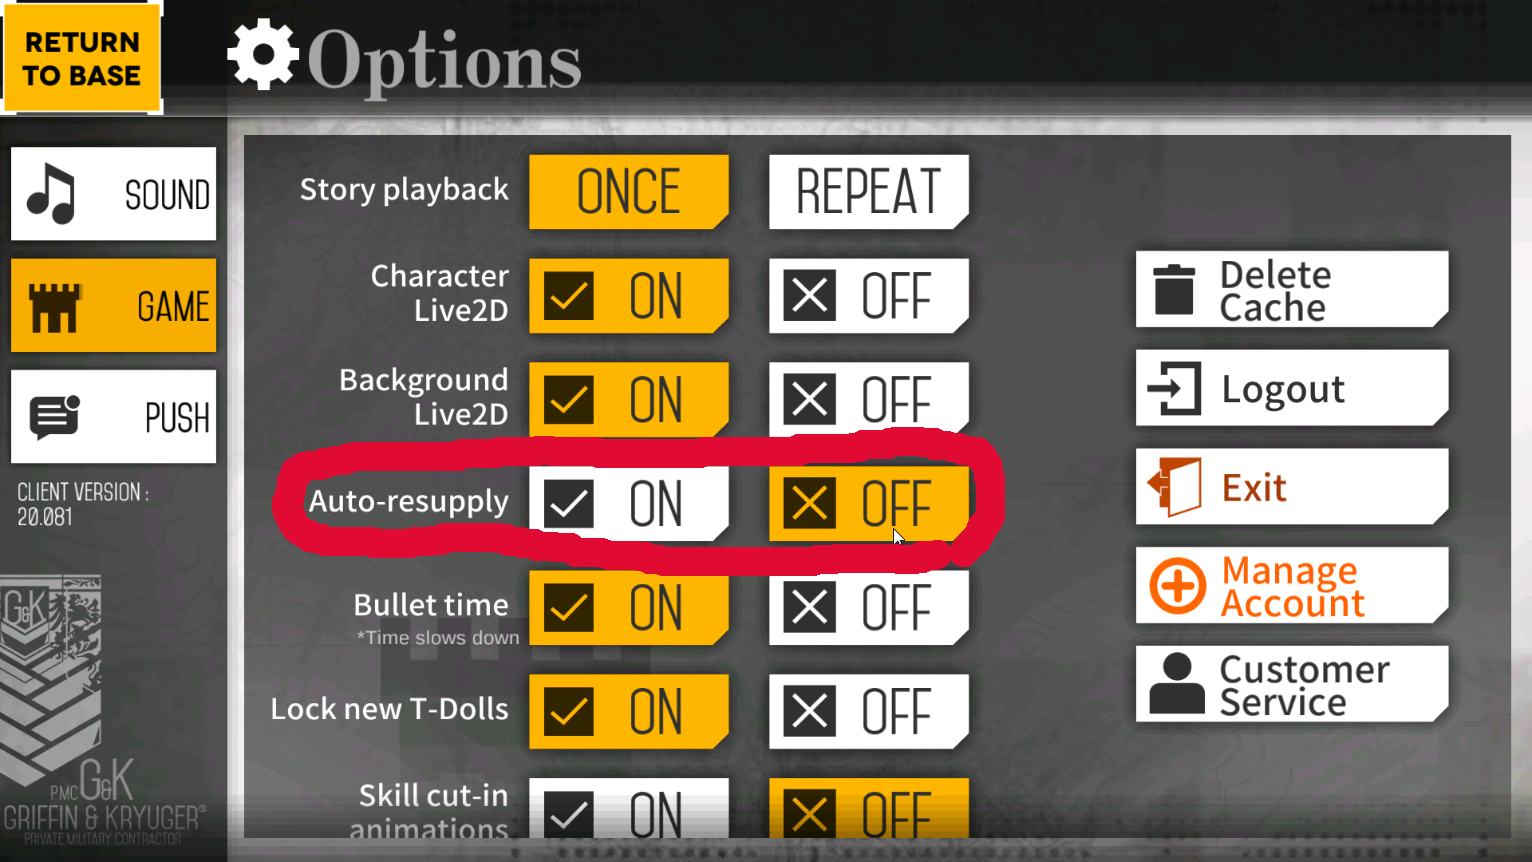
option to make sure you don't resupply your leveling echelon.
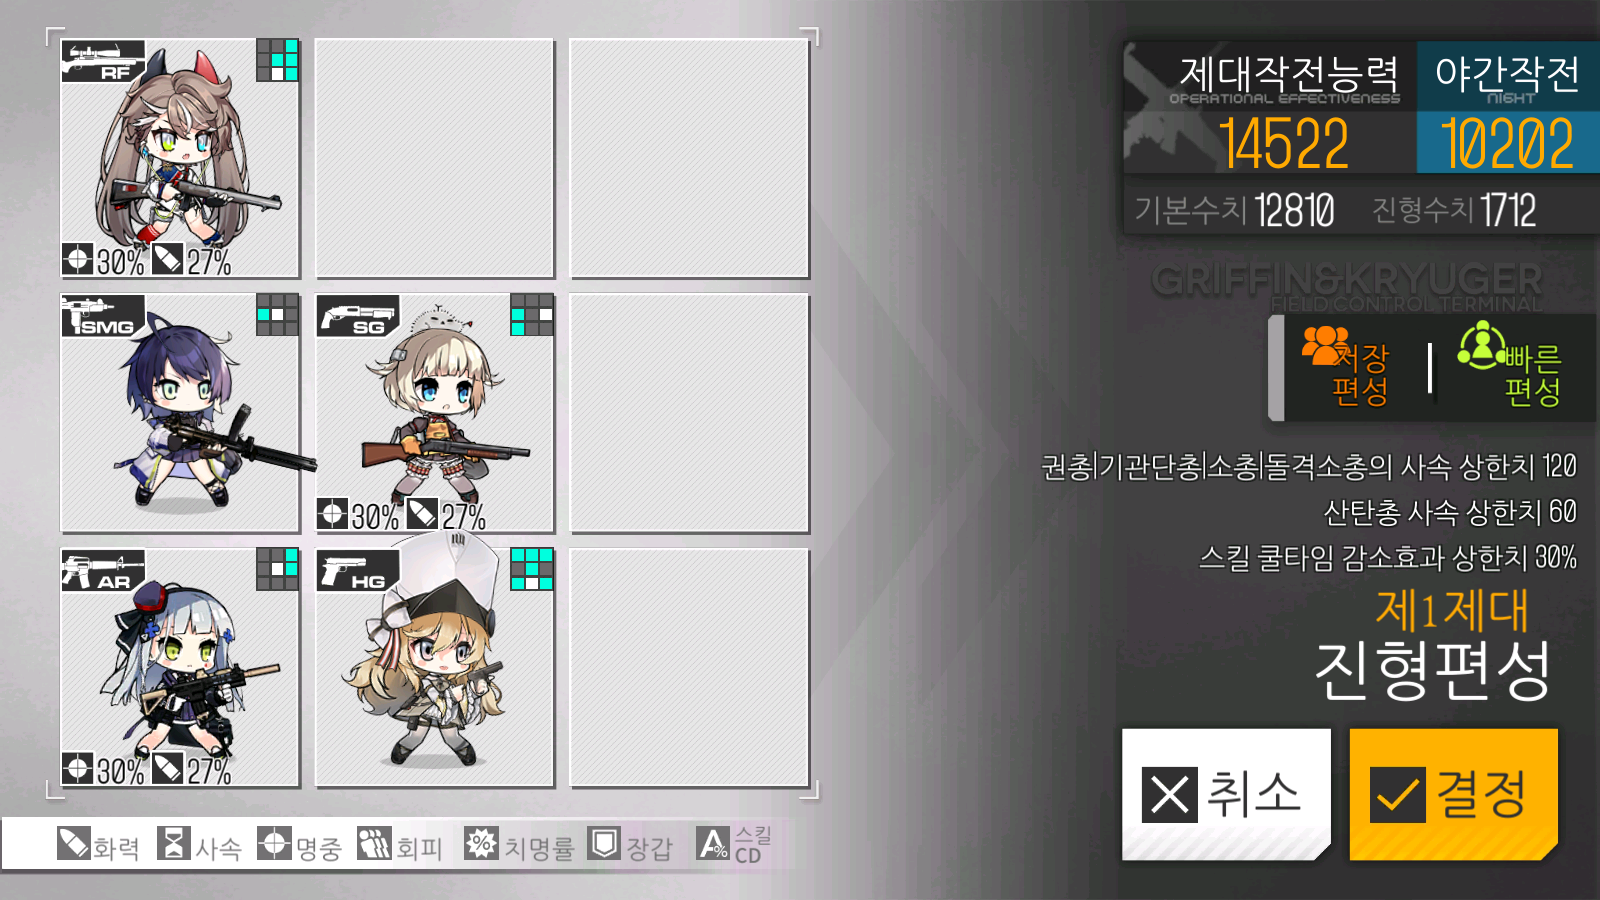
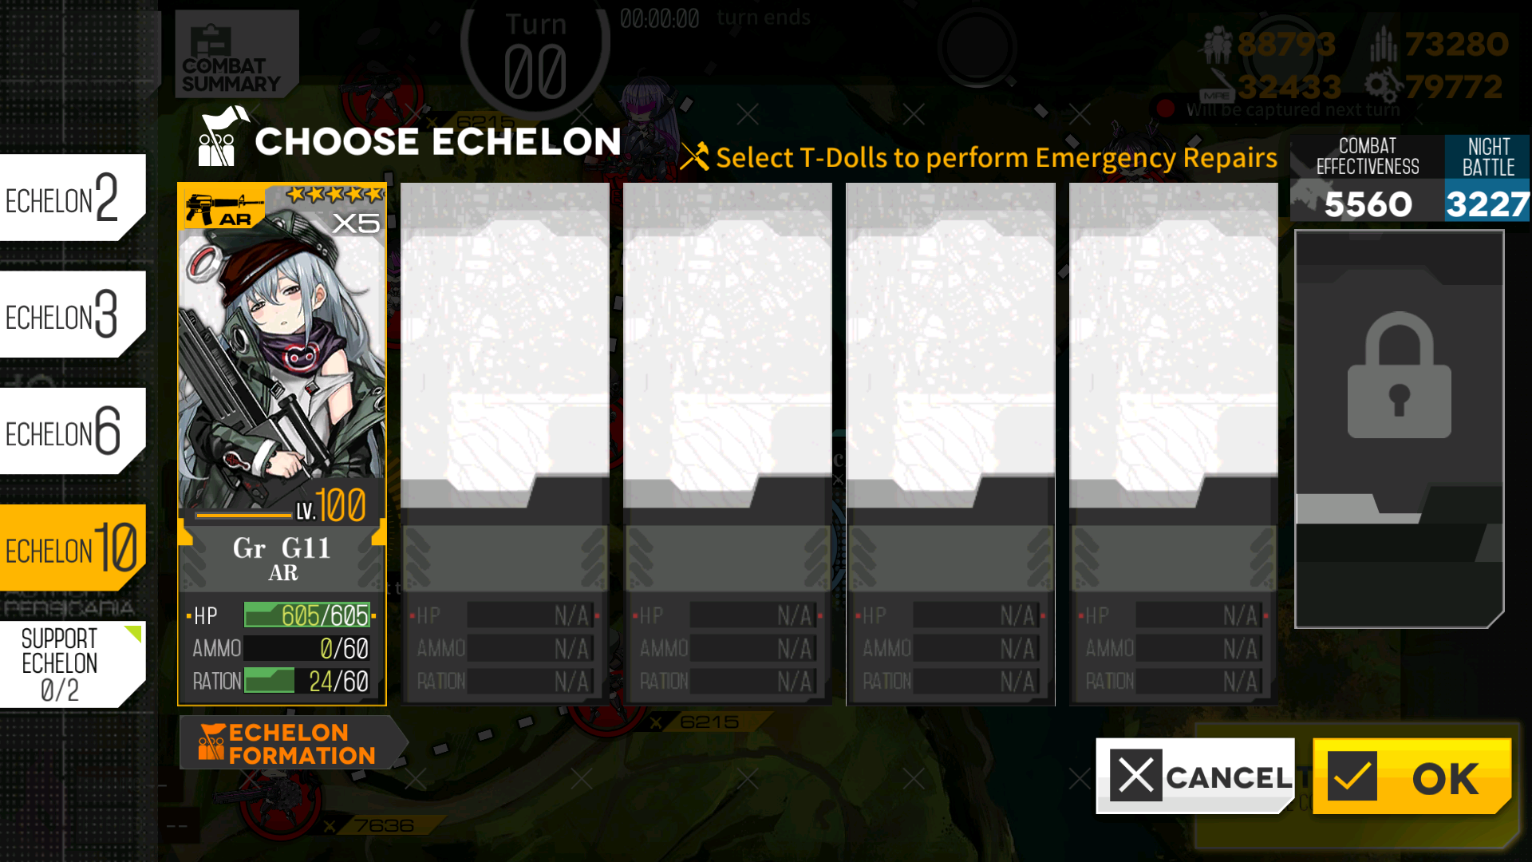
The idea is to have your leveling echelon look like this:
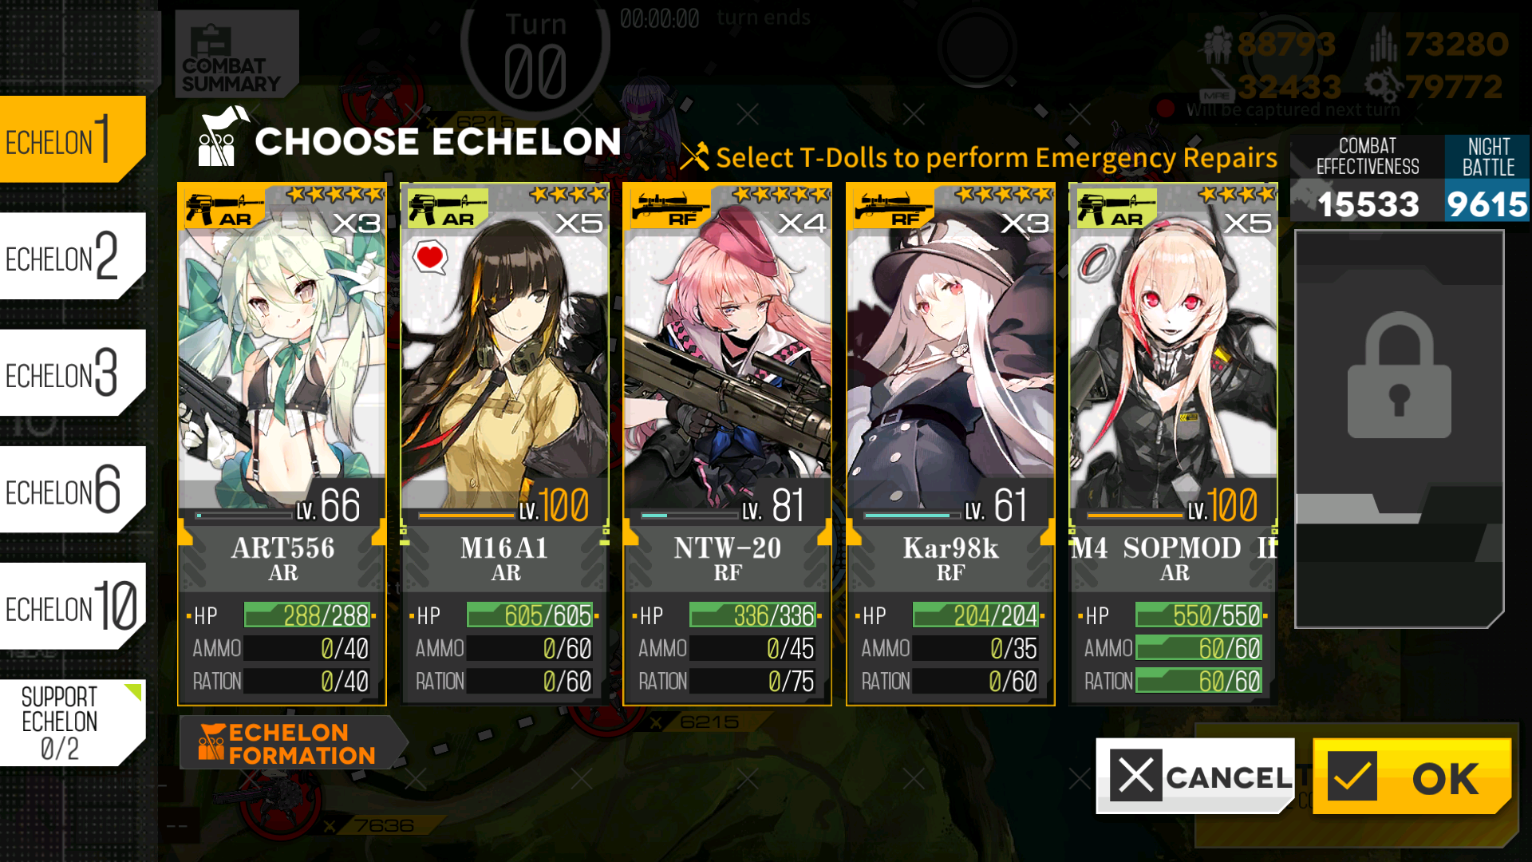
and your dummy echelon with your second DPS like this:
You'll start the map, then manually resupply your dummy DPS while clearing the map as normal with your leveling echelon. After clearing the map, you swap out the leveling echelon's DPS unit with the dummy echelon's unit. From here, the process repeats for as long as you want to go. Do note that you'll need to repair your tank every so often. I can't tell you how many runs it'll take before you need to repair, but every two or three runs is likely.
Okay, so you know how it works. But what DPS do you want to use? What about a tank? What maps do I even want to run this on?
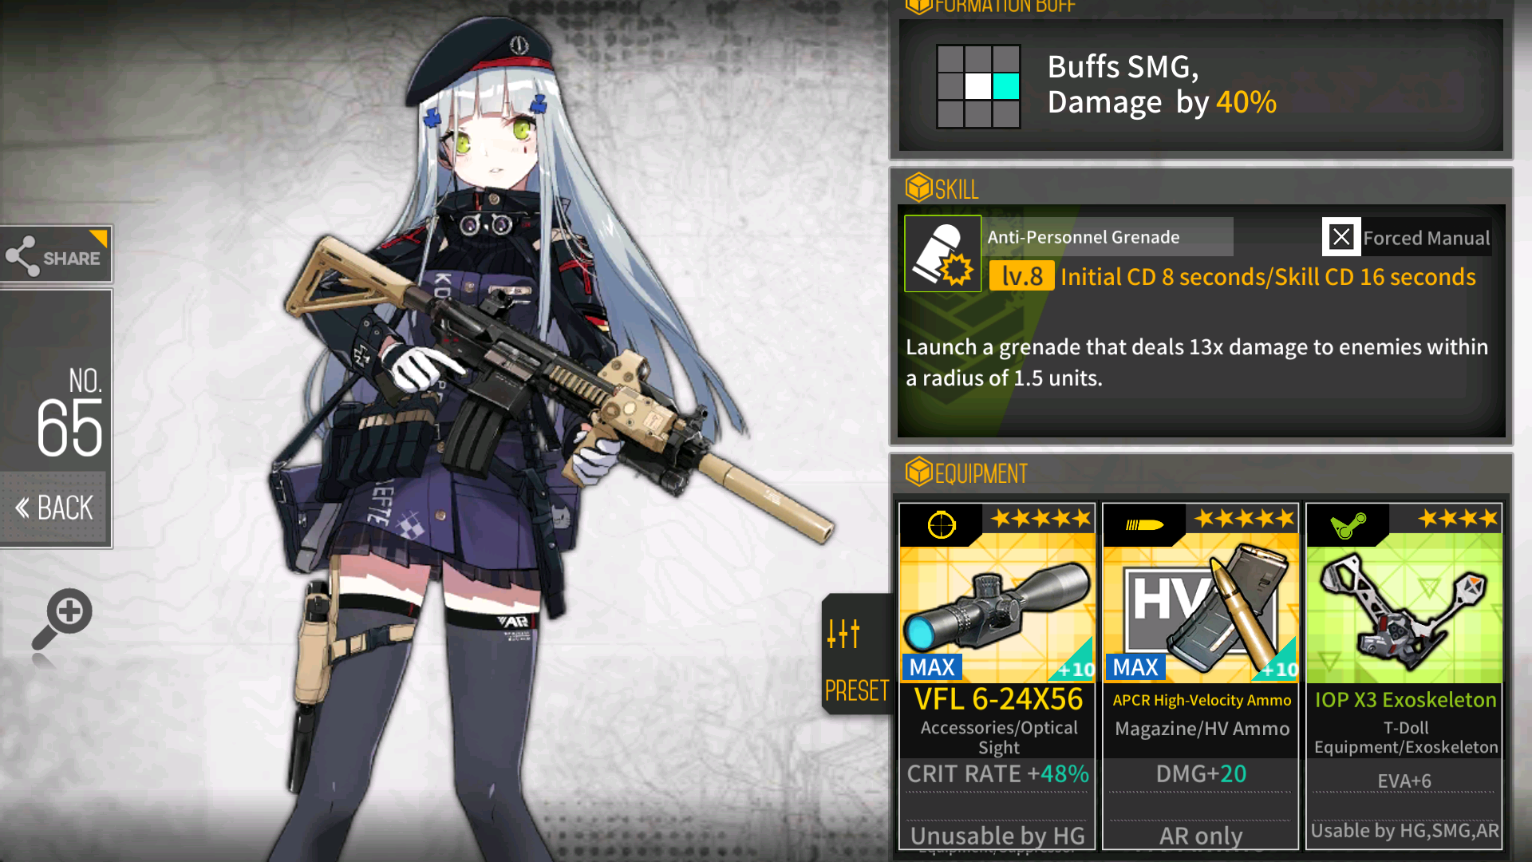
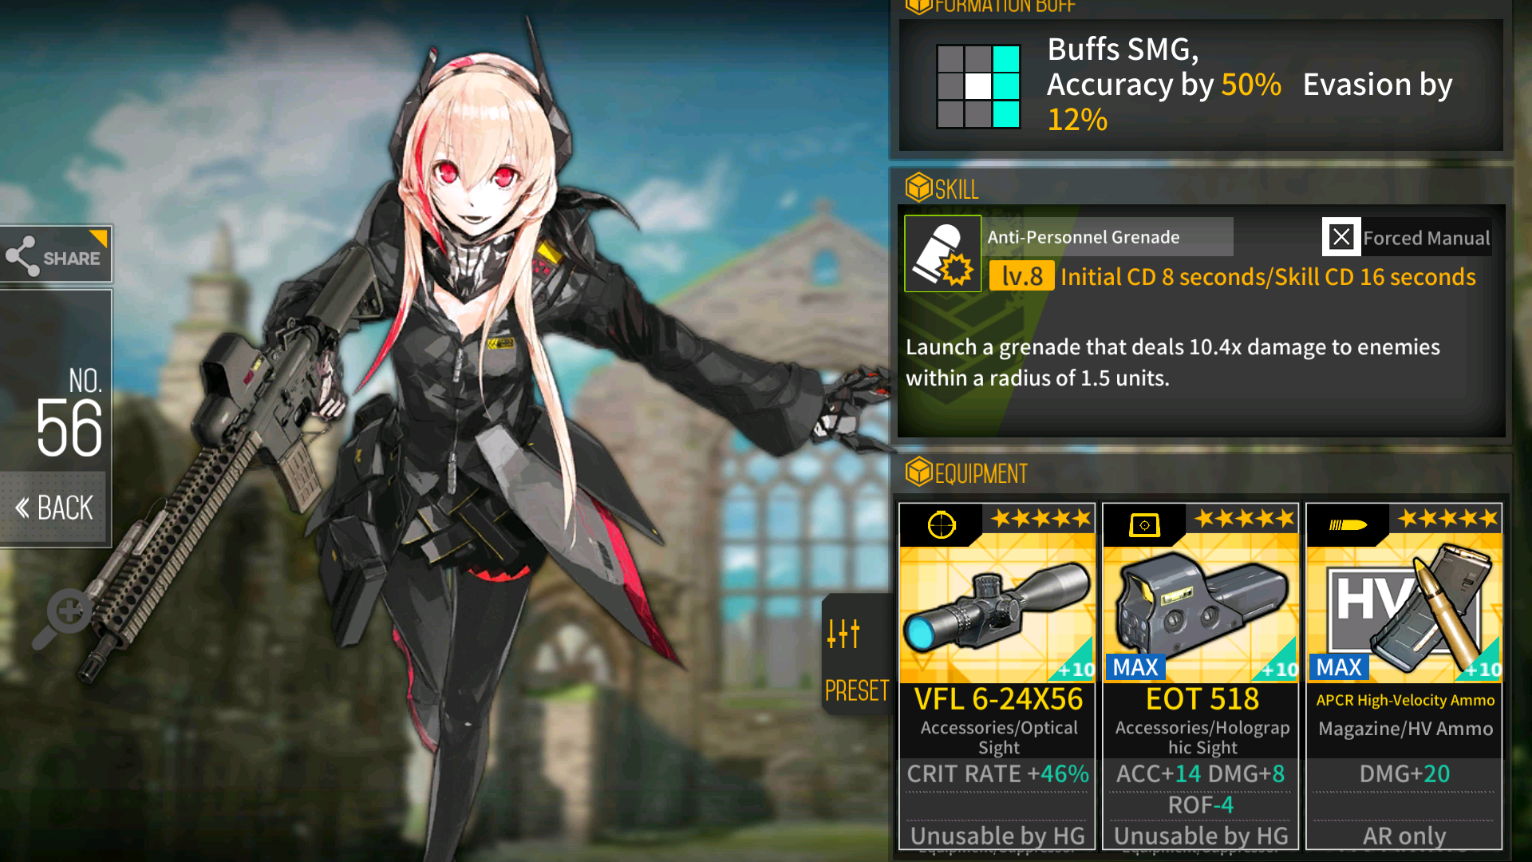
Currently the best DPS units to use are grenadiers like M4 SOPMOD II, 416, or FAL. Other options include Gr G11 or ST AR-15. It's ideal to use grenadiers because their skill has an opportunity to actually go off in battles, and the splash damage is very helpful when you're the only DPS. Enemies tend to stack up since they don't die very quickly while corpse dragging. You're also typically using ARs since they have a fairly low cost, resource wise, to deploy.
As for tanks, you can use any SMGs you really want, but the absolute best is M16A1. Why another AR? M16 can equip both an exoframe and an armour plate. This lets her have evade and armour, which limits the amount of damage that is done to her during a run. Do note that you want to have enough armour to make sure she's only taking 1 damage everytime she gets hit. This requirement depends on the map, however. In addition, you want to have as much evade as possible, so you'll want to also be running a T Type Exoframe.
So what map should you do? You, in theory, can do it on any leveling map...But the best one to run is 0-2, assuming you're strong enough to do it. It provides a high amount of exp and cores, which you'll be needing to dummy link all the units you're dragging with you. For 0-2, you want to get +10 armour for M16 so she only takes 1 damage per hit. A +7 max calibrated 5 star armour plate will be enough to cover this.
If you need some help visualizing this, the video below may help.
Example equipment setups for corpse dragging:
M16:
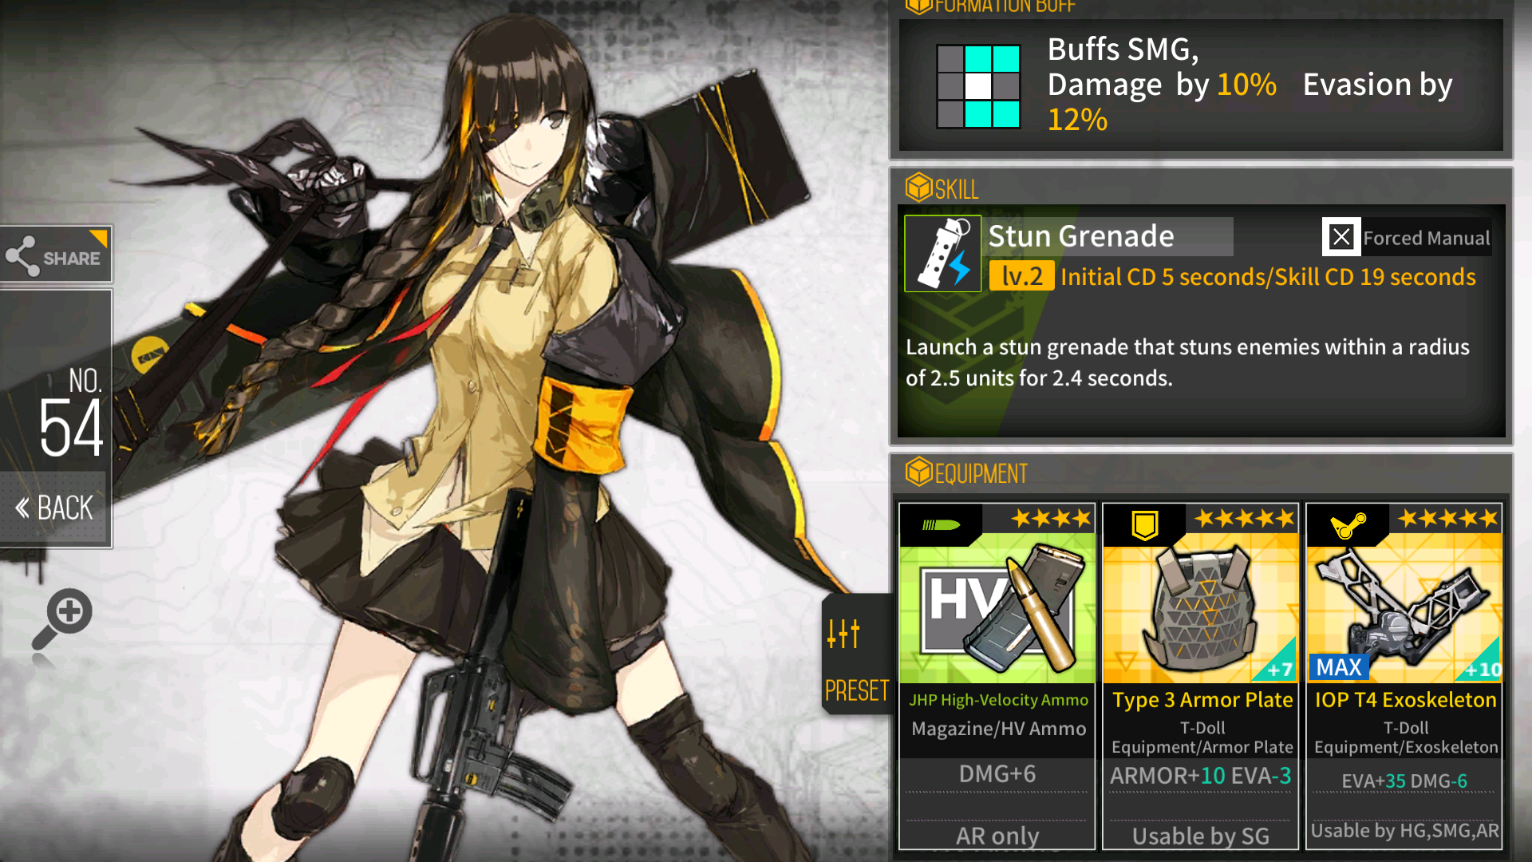
Grenadier:
Sopmod:
Here's an example video of me doing this method of grinding in 0-2.
Author: Kazuki
Tags: First Steps Leveling